Team Project (tP):
Week 3 [Fri, Aug 21st] - Topics
Detailed Table of Contents
- [W3.1] RCS: Branching
- [W3.2] RCS: Creating Pull Requests
- [W3.2a] Tools → Git and GitHub → Creating PRs
- [W3.3] Java
-
[W3.3a] Implementation → Documentation → Tools → JavaDoc → What
-
[W3.3b] Implementation → Documentation → Tools → JavaDoc → How
-
[W3.3c] C++ to Java → Miscellaneous Topics → File access :
-
[W3.3d] C++ to Java → Miscellaneous Topics → Packages :
-
[W3.3e] C++ to Java → Miscellaneous Topics → Using JAR files :
- [W3.4] Code Quality: Coding Standards
- [W3.5] Developer Testing
- [W3.6] Unit Testing
-
[W3.6a] Quality Assurance → Testing → Test Automation → Test automation using test drivers
-
[W3.6b] Quality Assurance → Testing → Test Automation → Test automation tools
-
[W3.6c] Quality Assurance → Testing → Unit Testing → What
-
[W3.6d] C++ to Java → JUnit → JUnit: Basic
-
[W3.6e] Quality Assurance → Testing → Unit Testing → Stubs
-
[W3.6f] C++ to Java → JUnit → JUnit: Intermediate
Guidance for the item(s) below:
Let's learn about a few more Git techniques, starting with branching. Although these techniques are not really needed for the iP, we force you to use them in the iP so that you have more time to practice them before they are really needed in the tP.
Project Management → Revision Control → Branching
Can explain branching
Branching is the process of evolving multiple versions of the software in parallel. For example, one team member can create a new branch and add an experimental feature to it while the rest of the team keeps working on another branch. Branches can be given names e.g. master, release, dev.
A branch can be merged into another branch. Merging usually results in a new commit that represents the changes done in the branch being merged.
Merge conflicts happen when you try to merge two branches that had changed the same part of the code and the RCS cannot decide which changes to keep. In those cases, you have to ‘resolve’ the conflicts manually.
Exercises
What is branching?
In the context of RCS, what is branching? What is the need for branching?
What is merging?
In the context of RCS, what does merging branches mean? How can it lead to merge conflicts?
Tools → Git and GitHub → branch: Doing multiple parallel changes
Project Management → Revision Control → Branching
Can use Git branching
Git supports branching, which allows you to do multiple parallel changes to the content of a repository.
A Git branch is simply a named label pointing to a commit. The HEAD label indicates which branch you are on. Git creates a branch named master by default. When you add a commit, it goes into the branch you are currently on, and the branch label (together with the HEAD label) moves to the new commit.
Given below is an illustration of how branch labels move as branches evolve.
- There is only one branch (i.e.,
master) and there is only one commit on it. - A new commit has been added. The
masterand theHEADlabels have moved to the new commit. - A new branch
fix1has been added. The repo has switched to the new branch too (hence, theHEADlabel is attached to thefix1branch). - A new commit (
c) has been added. The current branch labelfix1moves to the new commit, together with theHEADlabel. - The repo has switched back to the
masterbranch.
- A new commit (
d) has been added. Themasterlabel has moved to that commit. - The repo has switched back to the
fix1branch and added a new commit (e) to it. - The repo has switched to the
masterbranch and thefix1branch has been merged into themasterbranch, creating a merge commitf. The repo is currently on themasterbranch.
Follow the steps below to learn how to work with branches. You can use any repo you have on your computer (e.g. a clone of the samplerepo-things) for this.
0. Observe that you are normally in the branch called master.

git status
on branch master
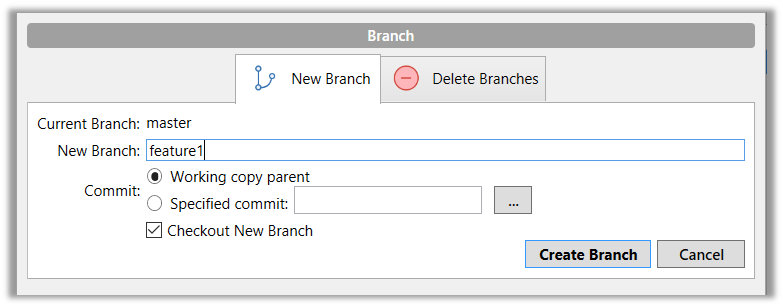
1. Start a branch named feature1 and switch to the new branch.
Click on the Branch button on the main menu. In the next dialog, enter the branch name and click Create Branch.
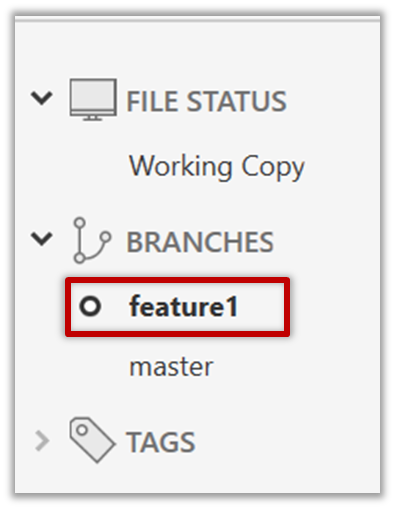
Note how the feature1 is indicated as the current branch.
You can use the branch command to create a new branch and the checkout command to switch to a specific branch.
git branch feature1
git checkout feature1
One-step shortcut to create a branch and switch to it at the same time:
git checkout –b feature1
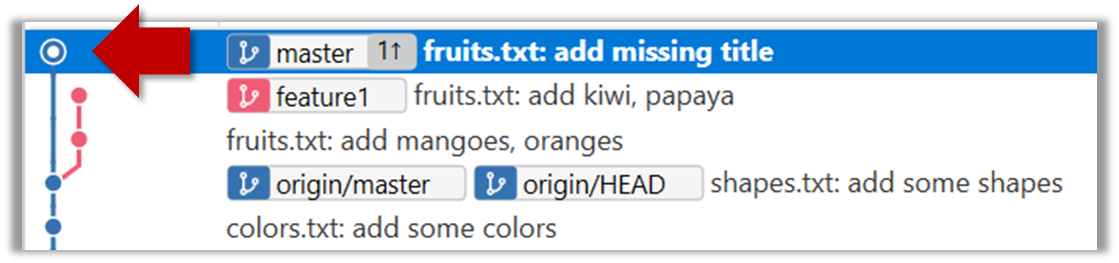
2. Create some commits in the new branch. Just commit as per normal. Commits you add while on a certain branch will become part of that branch.
Note how the master label and the HEAD label moves to the new commit (The HEAD label of the local repo is represented as in SourceTree).
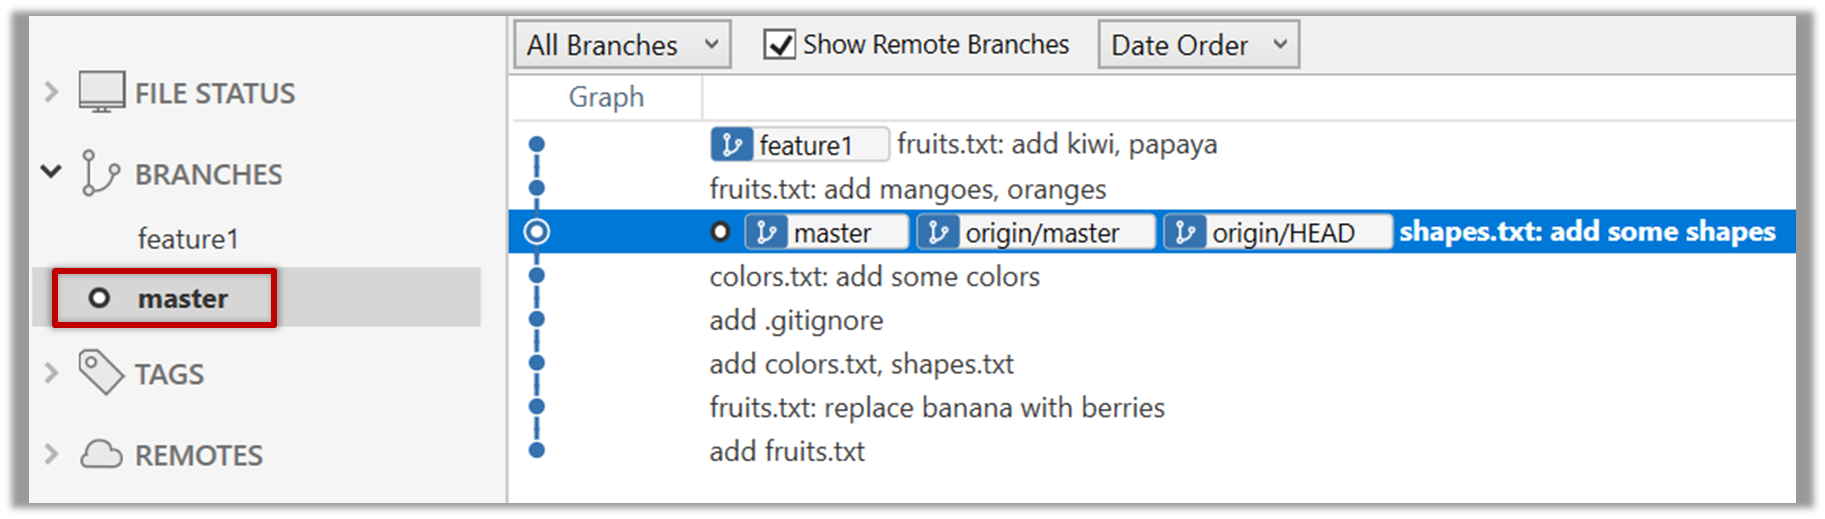
3. Switch to the master branch. Note how the changes you did in the feature1 branch are no longer in the working directory.
Double-click the master branch.
git checkout master
4. Add a commit to the master branch. Let’s imagine it’s a bug fix.
To keep things simple for the time being, this commit should not involve the same content that you changed in the feature1 branch. To be on the safe side, this commit can change an entirely different file.
5. Switch back to the feature1 branch (similar to step 3).
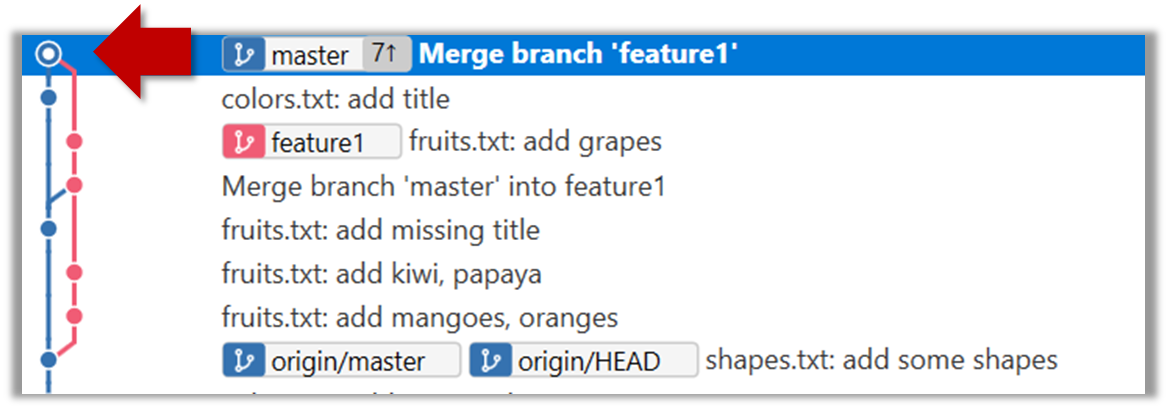
6. Merge the master branch to the feature1 branch, giving an end-result like the following. Also note how Git has created a merge commit.

Right-click on the master branch and choose merge master into the current branch. Click OK in the next dialog.
git merge master
The objective of that merge was to sync the feature1 branch with the master branch. Observe how the changes you did in the master branch (i.e. the imaginary bug fix) is now available even when you are in the feature1 branch.
Instead of merging master to feature1, an alternative is to rebase the feature1 branch. However, rebasing is an advanced feature that requires modifying past commits. If you modify past commits that have been pushed to a remote repository, you'll have to force-push the modified commit to the remote repo in order to update the commits in it.
7. Add another commit to the feature1 branch.
8. Switch to the master branch and add one more commit.
9. Merge feature1 to the master branch, giving and end-result like this:
Right-click on the feature1 branch and choose Merge....
git merge feature1
10. Create a new branch called add-countries, switch to it, and add some commits to it (similar to steps 1-2 above). You should have something like this now:
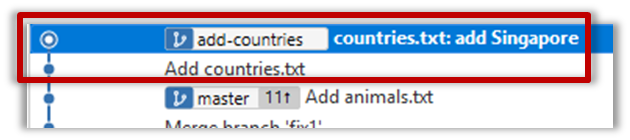
Avoid this common rookie mistake!
Always remember to switch back to the master branch before creating a new branch. If not, your new branch will be created on top of the current branch.
11. Go back to the master branch and merge the add-countries branch onto the master branch (similar to steps 8-9 above). While you might expect to see something like the following,
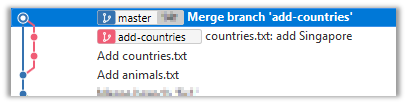
... you are likely to see something like this instead:

That is because Git does a fast forward merge if possible. Seeing that the master branch has not changed since you started the add-countries branch, Git has decided it is simpler to just put the commits of the add-countries branch in front of the master branch, without going into the trouble of creating an extra merge commit.
It is possible to force Git to create a merge commit even if fast forwarding is possible.
Tick the box shown below when you merge a branch:
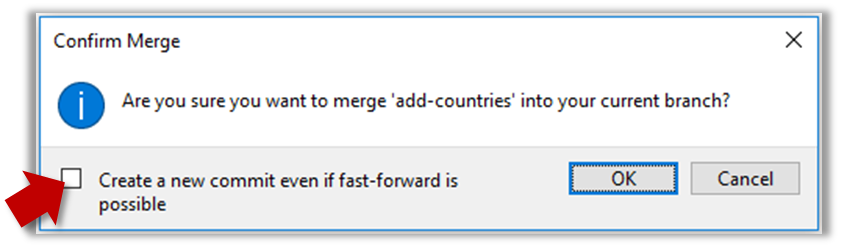
Use the --no-ff switch (short for no fast forward):
git merge --no-ff add-countries
Pushing a branch to a remote repo
Here's how to push a branch to a remote repo:
Here's how to push a branch named add-intro to your own fork of a repo named samplerepo-pr-practice:
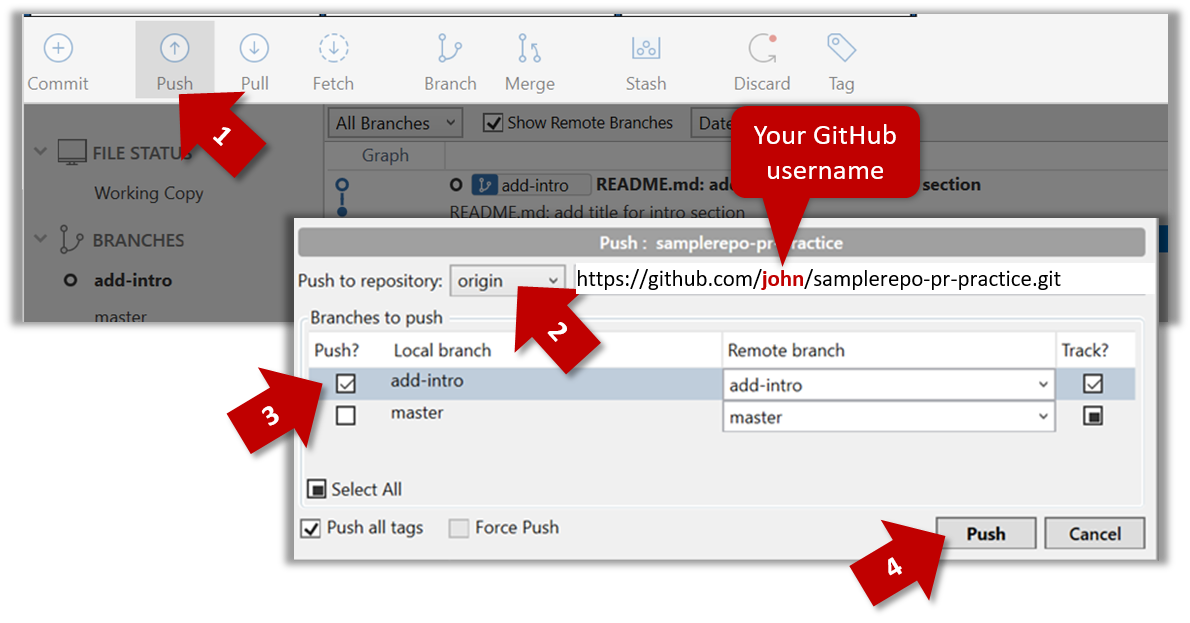
Normally: git push {remote repository} {branch}. Examples:
git push origin masterpushes themasterbranch to the repo namedorigin(i.e., the repo you cloned from)git push upstream-repo add-intropushes theadd-introbranch to the repo namedupstream-repo
If pushing a branch you created locally to the remote for the first time, add the -u flag to get the local branch to track the new upstream branch:
e.g., git push -u origin add-intro
See git-scm.com/docs/git-push for details of the push command.
Tools → Git and GitHub → Dealing with merge conflicts
Can use Git to resolve merge conflicts
Merge conflicts happen when you try to combine two incompatible versions (e.g., merging a branch to another but each branch changed the same part of the code in a different way).
Here are the steps to simulate a merge conflict and use it to learn how to resolve merge conflicts.
0. Create an empty repo or clone an existing repo, to be used for this activity.
1. Start a branch named fix1 in the repo. Create a commit that adds a line with some text to one of the files.
2. Switch back to master branch. Create a commit with a conflicting change i.e. it adds a line with some different text in the exact location the previous line was added.
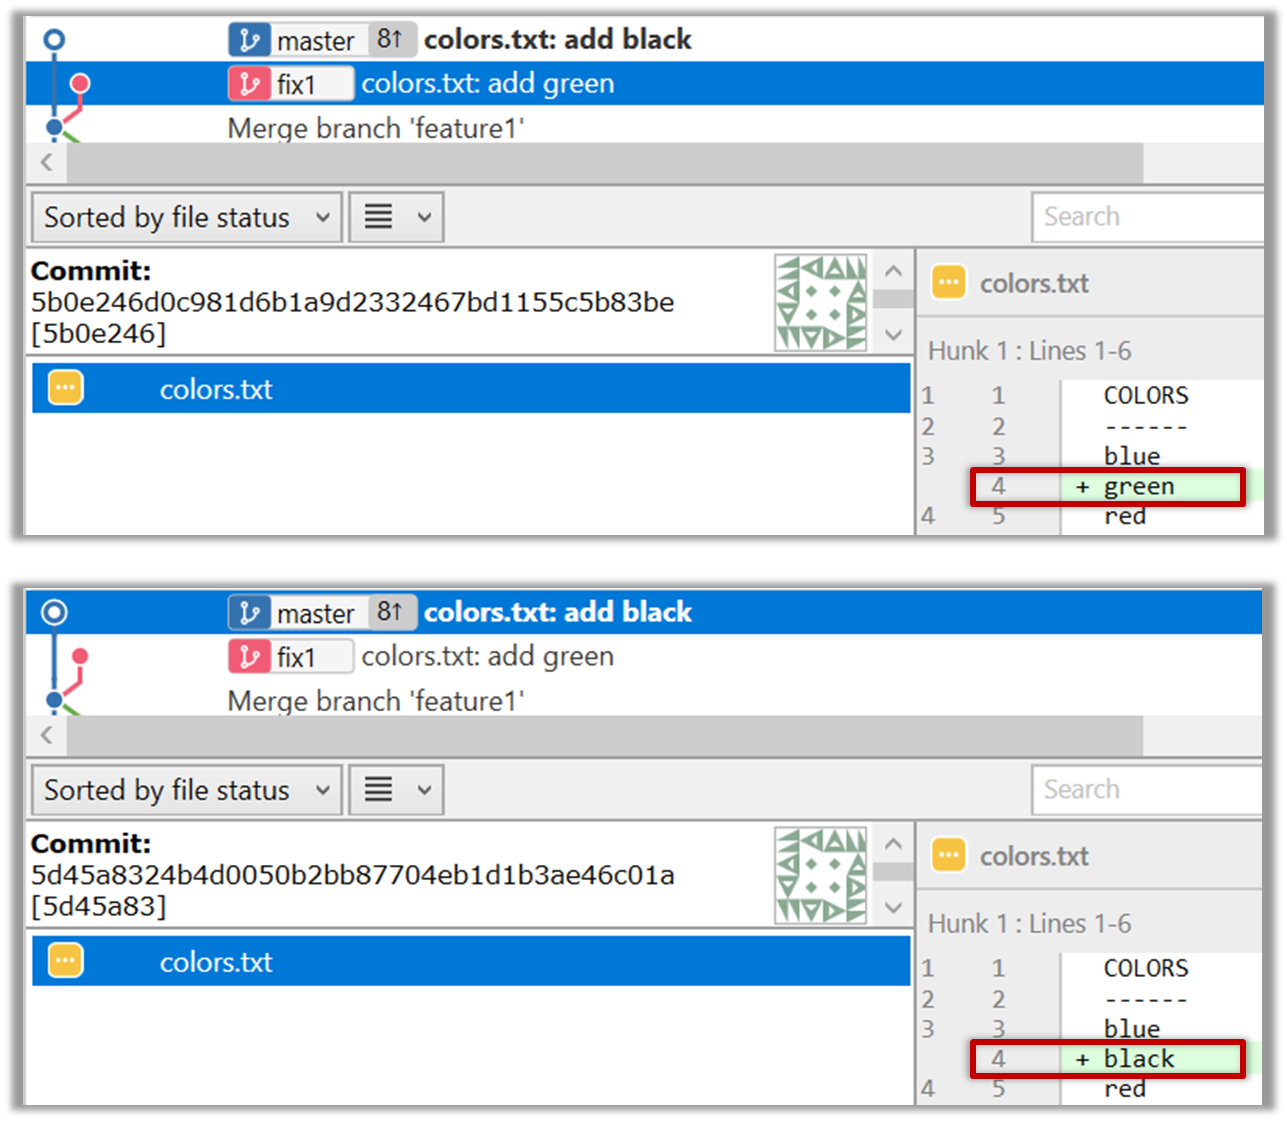
3. Try to merge the fix1 branch onto the master branch. Git will pause mid-way during the merge and report a merge conflict. If you open the conflicted file, you will see something like this:
COLORS
------
blue
<<<<<< HEAD
black
=======
green
>>>>>> fix1
red
white
4. Observe how the conflicted part is marked between a line starting with <<<<<< and a line starting with >>>>>>, separated by another line starting with =======.
Highlighted below is the conflicting part that is coming from the master branch:
blue
<<<<<< HEAD
black
=======
green
>>>>>> fix1
red
This is the conflicting part that is coming from the fix1 branch:
blue
<<<<<< HEAD
black
=======
green
>>>>>> fix1
red
5. Resolve the conflict by editing the file. Let us assume you want to keep both lines in the merged version. You can modify the file to be like this:
COLORS
------
blue
black
green
red
white
6. Stage the changes, and commit.
Guidance for the item(s) below:
Let's learn how to create a pull request (PRs) on GitHub; you need to create one for your project this week.
Tools → Git and GitHub → Creating PRs
Can create PRs on GitHub
Suppose you want to propose some changes to a GitHub repo (e.g., samplerepo-pr-practice) as a pull request (PR). Here is a scenario you can try in order to learn how to create PRs:
A pull request (PR for short) is a mechanism for contributing code to a remote repo, i.e., "I'm requesting you to pull my proposed changes to your repo". For this to work, the two repos must have a shared history. The most common case is sending PRs from a fork to its upstream repo is a repo you forked fromupstream repo.
1. Fork the repo onto your GitHub account.
2. Clone it onto your computer.
3. Commit your changes e.g., add a new file with some contents and commit it.
- Option A - Commit changes to the
masterbranch - Option B - Commit to a new branch e.g., create a branch named
add-intro(remember to switch to themasterbranch before creating a new branch) and add your commit to it.
4. Push the branch you updated (i.e., master branch or the new branch) to your fork, as explained here.
Pushing a branch to a remote repo
Here's how to push a branch to a remote repo:
Here's how to push a branch named add-intro to your own fork of a repo named samplerepo-pr-practice:
Normally: git push {remote repository} {branch}. Examples:
git push origin masterpushes themasterbranch to the repo namedorigin(i.e., the repo you cloned from)git push upstream-repo add-intropushes theadd-introbranch to the repo namedupstream-repo
If pushing a branch you created locally to the remote for the first time, add the -u flag to get the local branch to track the new upstream branch:
e.g., git push -u origin add-intro
See git-scm.com/docs/git-push for details of the push command.
5. Initiate the PR creation:
-
Go to your fork.
-
Click on the Pull requests tab followed by the New pull request button. This will bring you to the 'Comparing changes' page.
-
Set the appropriate target repo and the branch that should receive your PR, using the
base repositoryandbasedropdowns. e.g.,
base repository: se-edu/samplerepo-pr-practice base: masterNormally, the default value shown in the dropdown is what you want but in case your fork has e.g., the repo you forked from is also a fork of a another repo, which means both of those are considered upstream repos of your forkmultiple upstream repos, the default may not be what you want.
-
Indicate which repo:branch contains your proposed code, using the
head repositoryandcomparedropdowns. e.g.,
head repository: myrepo/samplerepo-pr-practice compare: master
6. Verify the proposed code: Verify that the diff view in the page shows the exact change you intend to propose. If it doesn't, commit the new code and push to the branchupdate the branch as necessary.
7. Submit the PR:
-
Click the Create pull request button.
-
Fill in the PR name and description e.g.,
Name:Add an introduction to the README.md
Description:Add some paragraph to the README.md to explain ...
Also add a heading ... -
If you want to indicate that the PR you are about to create is 'still work in progress, not yet ready', click on the dropdown arrow in the Create pull request button and choose
Create draft pull requestoption. -
Click the Create pull request button to create the PR.
-
Go to the receiving repo to verify that your PR appears there in the
Pull requeststab.
The next step of the PR life cycle is the PR review. The members of the repo that received your PR can now review your proposed changes.
- If they like the changes, they can merge the changes to their repo, which also closes the PR automatically.
- If they don't like it at all, they can simply close the PR too i.e., they reject your proposed change.
- In most cases, they will add comments to the PR to suggest further changes. When that happens, GitHub will notify you.
You can update the PR along the way too. Suppose PR reviewers suggested a certain improvement to your proposed code. To update your PR as per the suggestion, you can simply modify the code in your local repo, commit the updated code to the same master branch, and push to your fork as you did earlier. The PR will auto-update accordingly.
Sending PRs using the master branch is less common than sending PRs using separate branches. For example, suppose you wanted to propose two bug fixes that are not related to each other. In that case, it is more appropriate to send two separate PRs so that each fix can be reviewed, refined, and merged independently. But if you send PRs using the master branch only, both fixes (and any other change you do in the master branch) will appear in the PRs you create from it.
To create another PR while the current PR is still under review, create a new branch (remember to switch back to the master branch first), add your new proposed change in that branch, and create a new PR following the steps given above.
It is possible to create PRs within the same repo e.g., you can create a PR from branch feature-x to the master branch, within the same repo. Doing so will allow the code to be reviewed by other developers (using PR review mechanism) before it is merged.
Resources
Guidance for the item(s) below:
Let's start by going through some Java topics that is relevant to the iP. You can skim through or skip topics that you are familiar with already.
Implementation → Documentation → Tools → JavaDoc → What
Can explain JavaDoc
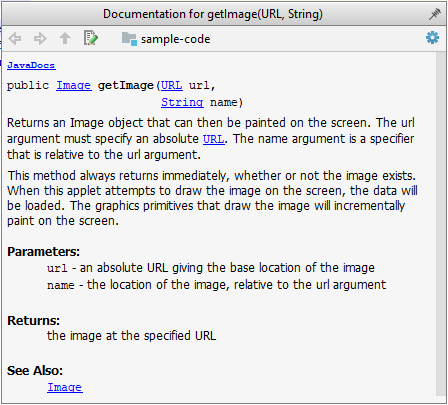
JavaDoc is a tool for generating API documentation in HTML format from comments in the source code. In addition, modern IDEs use JavaDoc comments to generate explanatory tooltips.
An example method header comment in JavaDoc format (adapted from Oracle's Java documentation)
/**
 * Returns an Image object that can then be painted on the screen.
 * The url argument must specify an absolute {@link URL}. The name
 * argument is a specifier that is relative to the url argument.
 * <p>
 * This method always returns immediately, whether or not the
 * image exists. When this applet attempts to draw the image on
 * the screen, the data will be loaded. The graphics primitives
 * that draw the image will incrementally paint on the screen.
 *
 * @param url an absolute URL giving the base location of the image
 * @param name the location of the image, relative to the url argument
 * @return the image at the specified URL
 * @see Image
 */
public Image getImage(URL url, String name) {
    try {
        return getImage(new URL(url, name));
    } catch (MalformedURLException e) {
        return null;
    }
}
Generated HTML documentation:

Tooltip generated by Intellij IDE:
Implementation → Documentation → Tools → JavaDoc → How
Can write JavaDoc comments
In the absence of more extensive guidelines (e.g., given in a coding standard adopted by your project), you can follow the two examples below in your code.
A minimal JavaDoc comment example for methods:
/**
 * Returns lateral location of the specified position.
 * If the position is unset, NaN is returned.
 *
 * @param x X coordinate of position.
 * @param y Y coordinate of position.
 * @param zone Zone of position.
 * @return Lateral location.
 * @throws IllegalArgumentException If zone is <= 0.
 */
public double computeLocation(double x, double y, int zone)
    throws IllegalArgumentException {
    // ...
}
A minimal JavaDoc comment example for classes:
package ...

import ...

/**
 * Represents a location in a 2D space. A <code>Point</code> object corresponds to
 * a coordinate represented by two integers e.g., <code>3,6</code>
 */
public class Point {
    // ...
}
Resources
- A short tutorial on writing JavaDoc comments -- from tutorialspoint.com
- A more detailed description -- from Oracle
C++ to Java → Miscellaneous Topics → File access
Can read/write text files using Java
You can use the java.io.File class to represent a file object. It can be used to access properties of the file object.
This code creates a File object to represent a file fruits.txt that exists in the data directory relative to the current working directory and uses that object to print some properties of the file.
import java.io.File;

public class FileClassDemo {

    public static void main(String[] args) {
        File f = new File("data/fruits.txt");
        System.out.println("full path: " + f.getAbsolutePath());
        System.out.println("file exists?: " + f.exists());
        System.out.println("is Directory?: " + f.isDirectory());
    }

}
full path: C:\sample-code\data\fruits.txt
file exists?: true
is Directory?: false
If you use backslash to specify the file path in a Windows computer, you need to use an additional backslash as an escape character because the backslash by itself has a special meaning. e.g., use "data\\fruits.txt", not "data\fruits.txt". Alternatively, you can use forward slash "data/fruits.txt" (even on Windows).
You can read from a file using a Scanner object that uses a File object as the source of data.
This code uses a Scanner object to read (and print) contents of a text file line-by-line:
import java.io.File;
import java.io.FileNotFoundException;
import java.util.Scanner;

public class FileReadingDemo {

    private static void printFileContents(String filePath) throws FileNotFoundException {
        File f = new File(filePath); // create a File for the given file path
        Scanner s = new Scanner(f); // create a Scanner using the File as the source
        while (s.hasNext()) {
            System.out.println(s.nextLine());
        }
    }

    public static void main(String[] args) {
        try {
            printFileContents("data/fruits.txt");
        } catch (FileNotFoundException e) {
            System.out.println("File not found");
        }
    }

}
i.e., contents of the data/fruits.txt
5 Apples
3 Bananas
6 Cherries
You can use a java.io.FileWriter object to write to a file.
The writeToFile method below uses a FileWrite object to write to a file. The method is being used to write two lines to the file temp/lines.txt.
import java.io.FileWriter;
import java.io.IOException;

public class FileWritingDemo {

    private static void writeToFile(String filePath, String textToAdd) throws IOException {
        FileWriter fw = new FileWriter(filePath);
        fw.write(textToAdd);
        fw.close();
    }

    public static void main(String[] args) {
        String file2 = "temp/lines.txt";
        try {
            writeToFile(file2, "first line" + System.lineSeparator() + "second line");
        } catch (IOException e) {
            System.out.println("Something went wrong: " + e.getMessage());
        }
    }

}
Contents of the temp/lines.txt:
first line
second line
Note that you need to call the close() method of the FileWriter object for the writing operation to be completed.
You can create a FileWriter object that appends to the file (instead of overwriting the current content) by specifying an additional boolean parameter to the constructor.
The method below appends to the file rather than overwrites.
private static void appendToFile(String filePath, String textToAppend) throws IOException {
    FileWriter fw = new FileWriter(filePath, true); // create a FileWriter in append mode
    fw.write(textToAppend);
    fw.close();
}
The java.nio.file.Files is a utility class that provides several useful file operations. It relies on the java.nio.file.Paths file to generate Path objects that represent file paths.
This example uses the Files class to copy a file and delete a file.
import java.io.IOException;
import java.nio.file.Files;
import java.nio.file.Paths;

public class FilesClassDemo {

    public static void main(String[] args) throws IOException{
        Files.copy(Paths.get("data/fruits.txt"), Paths.get("temp/fruits2.txt"));
        Files.delete(Paths.get("temp/fruits2.txt"));
    }

}
The techniques above are good enough to manipulate simple text files. Note that it is also possible to perform file I/O operations using other classes.
C++ to Java → Miscellaneous Topics → Packages
Can use Java packages
You can organize your types (i.e., classes, interfaces, enumerations, etc.) into packages for easier management (among other benefits).
To create a package, you put a package statement at the very top of every source file in that package. The package statement must be the first line in the source file and there can be no more than one package statement in each source file. Furthermore, the package of a type should match the folder path of the source file. Similarly, the compiler will put the .class files in a folder structure that matches the package names.
The Formatter class below (in <source folder>/seedu/tojava/util/Formatter.java file) is in the package seedu.tojava.util. When it is compiled, the Formatter.class file will be in the location <compiler output folder>/seedu/tojava/util:
package seedu.tojava.util;

public class Formatter {
    public static final String PREFIX = ">>";

    public static String format(String s){
        return PREFIX + s;
    }
}
Package names are written in all lower case (not camelCase), using the dot as a separator. Packages in the Java language itself begin with java. or javax. Companies use their reversed Internet domain name to begin their package names.
For example, com.foobar.doohickey.util can be the name of a package created by a company with a domain name foobar.com
To use a public types contained in the packagepackage member from outside its package, you must do one of the following:
- Use the type name prefixed by the package name e.g.,
java.io.IOExceptionfully qualified name to refer to the member - Import the package or the specific package member
The Main class below has two import statements:
import seedu.tojava.util.StringParser: imports the classStringParserin theseedu.tojava.utilpackageimport seedu.tojava.frontend.*: imports all the classes in theseedu.tojava.frontendpackage
package seedu.tojava;

import seedu.tojava.util.StringParser;
import seedu.tojava.frontend.*;

public class Main {

    public static void main(String[] args) {

        // Using the fully qualified name to access the Processor class
        String status = seedu.tojava.logic.Processor.getStatus();

        // Using the StringParser previously imported
        StringParser sp = new StringParser();

        // Using classes from the tojava.frontend package
        Ui ui = new Ui();
        Message m = new Message();

    }
}
Note how the class can still use the Processor without importing it first, by using its fully qualified name seedu.tojava.logic.Processor
Importing a package does not import its sub-packages, as packages do not behave as hierarchies despite appearances.
import seedu.tojava.frontend.* does not import the classes in the sub-package seedu.tojava.frontend.widget.
If you do not use a package statement, your type doesn't have a package -- a practice not recommended (except for small code examples) as it is not possible for a type in a package to import a type that is not in a package.
Optionally, a static import can be used to import static members of a type so that the imported members can be used without specifying the type name.
The class below uses static imports to import the constant PREFIX and the method format() from the seedu.tojava.util.Formatter class.
import static seedu.tojava.util.Formatter.PREFIX;
import static seedu.tojava.util.Formatter.format;

public class Main {

    public static void main(String[] args) {

        String formatted = format("Hello");
        boolean isFormatted = formatted.startsWith(PREFIX);
        System.out.println(formatted);
    }
}
Formatter class
package seedu.tojava.util;

public class Formatter {
    public static final String PREFIX = ">>";

    public static String format(String s){
        return PREFIX + s;
    }
}
Note how the class can use PREFIX and format() (instead of Formatter.PREFIX and Formatter.format()).
When using the commandline to compile/run Java, you should take the package into account.
If the seedu.tojava.Main class is defined in the file Main.java,
- when compiling from the
<source folder>, the command is:
javac seedu/tojava/Main.java - when running it from the
<compiler output folder>, the command is:
java seedu.tojava.Main
Resources
- Oracle's tutorial on packages: [What is a Package?] [Creating and Using Packages]
C++ to Java → Miscellaneous Topics → Using JAR files
Can use JAR files
Java applications are typically delivered as JAR (short for Java Archive) files. A JAR contains Java classes and other resources (icons, media files, etc.).
An executable JAR file can be launched using the java -jar command e.g., java -jar foo.jar launches the foo.jar file.
The IDE or build tools such as Gradle can help you to package your application as a JAR file.
See the tutorial Working with JAR files @se-edu/guides to learn how to create and use JAR files.
Guidance for the item(s) below:
As you know, one of the objectives of the iP is to raise the quality of your code. We'll be learning about various ways to improve the code quality in the next few weeks, starting with coding standards.
Guidance for the item(s) below:
Please watch the lecture video given below as it has some extra points not given in the text version.
Implementation → Code Quality → Introduction → What
Can explain the importance of code quality
Always code as if the person who ends up maintaining your code will be a violent psychopath who knows where you live. -- Martin Golding
Production code needs to be of high quality. Given how the world is becoming increasingly dependent on software, poor quality code is something no one can afford to tolerate.
Production Code
Implementation → Code Quality → Style → Introduction
Can explain the need for following a standard
One essential way to improve code quality is to follow a consistent style. That is why software engineers follow a strict coding standard (aka style guide).
The aim of a coding standard is to make the entire code base look like it was written by one person. A coding standard is usually specific to a programming language and specifies guidelines such as the locations of opening and closing braces, indentation styles and naming styles (e.g. whether to use Hungarian style, Pascal casing, Camel casing, etc.). It is important that the whole team/company uses the same coding standard and that the standard is generally not inconsistent with typical industry practices. If a company's coding standard is very different from what is typically used in the industry, new recruits will take longer to get used to the company's coding style.
IDEs can help to enforce some parts of a coding standard e.g. indentation rules.
Exercises
What is the recommended approach regarding coding standards?
What is the recommended approach regarding coding standards?
c
What is the aim? What is the value?
What is the aim of using a coding standard? How does it help?
Guidance for the item(s) below:
As promised last week, let's learn some more sophisticated ways of testing.
Quality Assurance → Testing → Developer Testing → What
Can explain developer testing
Developer testing is the testing done by the developers themselves as opposed to professional testers or end-users.
Quality Assurance → Testing → Developer Testing → Why
Can explain the need for early developer testing
Delaying testing until the full product is complete has a number of disadvantages:
- Locating the cause of a test case failure is difficult due to a large search space; in a large system, the search space could be millions of lines of code, written by hundreds of developers! The failure may also be due to multiple inter-related bugs.
- Fixing a bug found during such testing could result in major rework, especially if the bug originated from the design or during requirements specification i.e. a faulty design or faulty requirements.
- One bug might 'hide' other bugs, which could emerge only after the first bug is fixed.
- The delivery may have to be delayed if too many bugs are found during testing.
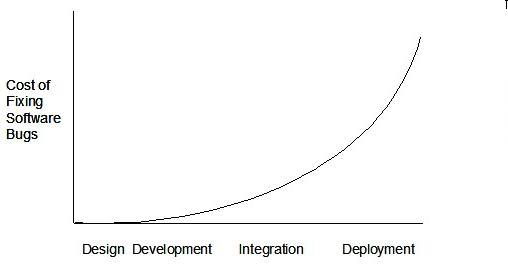
Therefore, it is better to do early testing, as hinted by the popular rule of thumb given below, also illustrated by the graph below it.
The earlier a bug is found, the easier and cheaper to have it fixed.
Such early testing of partially developed software is usually, and by necessity, done by the developers themselves i.e. developer testing.
Exercises
Implications of developers testing their own code
Discuss the pros and cons of developers testing their own code.
Pros:
- Can be done early (the earlier we find a bug, the cheaper it is to fix).
- Can be done at lower levels, for example, at the operation and class levels (testers usually test the system at the UI level).
- It is possible to do more thorough testing because developers know the expected external behavior as well as the internal structure of the component.
- It forces developers to take responsibility for their own work (they cannot claim that "testing is the job of the testers").
Cons:
- A developer may subconsciously only test situations that he knows to work (i.e. test it too 'gently').
- A developer may be blind to his own mistakes (if he did not consider a certain combination of input while writing the code, it is possible for him to miss it again during testing).
- A developer may have misunderstood what the SUT is supposed to do in the first place.
- A developer may lack the testing expertise.
Cost of bug fixing over time
The cost of fixing a bug goes down as we reach the product release.
False. The cost goes up over time.
Why early testing?
Explain why early testing by developers is important.
Quality Assurance → Testing → Test Automation → Test automation using test drivers
Can explain test drivers
A test driver is the code that ‘drives’ the Software Under TestSUT for the purpose of testing i.e. invoking the SUT with test inputs and verifying if the behavior is as expected.
PayrollTest ‘drives’ the Payroll class by sending it test inputs and verifies if the output is as expected.
public class PayrollTest {
    public static void main(String[] args) throws Exception {

        // test setup
        Payroll p = new Payroll();

        // test case 1
        p.setEmployees(new String[]{"E001", "E002"});
        // automatically verify the response
        if (p.totalSalary() != 6400) {
            throw new Error("case 1 failed ");
        }

        // test case 2
        p.setEmployees(new String[]{"E001"});
        if (p.totalSalary() != 2300) {
            throw new Error("case 2 failed ");
        }

        // more tests...

        System.out.println("All tests passed");
    }
}
Quality Assurance → Testing → Test Automation → Test automation tools
Can explain test automation tools
JUnit is a tool for automated testing of Java programs. Similar tools are available for other languages and for automating different types of testing.
This is an automated test for a Payroll class, written using JUnit libraries.
@Test
public void testTotalSalary() {
    Payroll p = new Payroll();

    // test case 1
    p.setEmployees(new String[]{"E001", "E002"});
    assertEquals(6400, p.totalSalary());

    // test case 2
    p.setEmployees(new String[]{"E001"});
    assertEquals(2300, p.totalSalary());

    // more tests...
}
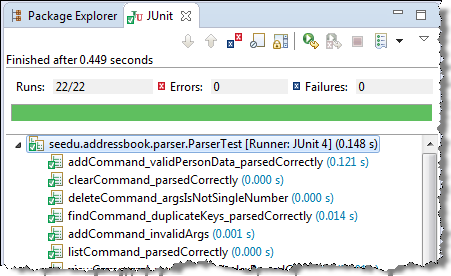
Most modern IDEs have integrated support for testing tools. The figure below shows the JUnit output when running some JUnit tests using the Eclipse IDE.
Quality Assurance → Testing → Unit Testing → What
Can explain unit testing
Unit testing: testing individual units (methods, classes, subsystems, ...) to ensure each piece works correctly.
In OOP code, it is common to write one or more unit tests for each public method of a class.
Here are the code skeletons for a Foo class containing two methods and a FooTest class that contains unit tests for those two methods.
class Foo {
    String read() {
        // ...
    }

    void write(String input) {
        // ...
    }

}
class FooTest {

    @Test
    void read() {
        // a unit test for Foo#read() method
    }

    @Test
    void write_emptyInput_exceptionThrown() {
        // a unit tests for Foo#write(String) method
    }

    @Test
    void write_normalInput_writtenCorrectly() {
        // another unit tests for Foo#write(String) method
    }
}
import unittest

class Foo:
  def read(self):
      # ...

  def write(self, input):
      # ...


class FooTest(unittest.TestCase):

  def test_read(self):
      # a unit test for read() method

  def test_write_emptyIntput_ignored(self):
      # a unit test for write(string) method

  def test_write_normalInput_writtenCorrectly(self):
      # another unit test for write(string) method
Resources
Side readings:
- [Web article] The three pillars of unit testing - A short article about what makes a good unit test.
- Learning from Apple’s #gotofail Security Bug - How unit testing (and other good coding practices) could have prevented a major security bug.
C++ to Java → JUnit → JUnit: Basic
Can use simple JUnit tests
When writing JUnit tests for a class Foo, the common practice is to create a FooTest class, which will contain various test methods.
Suppose we want to write tests for the IntPair class below.
public class IntPair {
    int first;
    int second;

    public IntPair(int first, int second) {
        this.first = first;
        this.second = second;
    }

    public int intDivision() throws Exception {
        if (second == 0){
            throw new Exception("Divisor is zero");
        }
        return first/second;
    }

    @Override
    public String toString() {
        return first + "," + second;
    }
}
Here's a IntPairTest class to match (using JUnit 5).
import org.junit.jupiter.api.Test;

import static org.junit.jupiter.api.Assertions.assertEquals;
import static org.junit.jupiter.api.Assertions.fail;

public class IntPairTest {


    @Test
    public void testStringConversion() {
        assertEquals("4,7", new IntPair(4, 7).toString());
    }

    @Test
    public void intDivision_nonZeroDivisor_success() throws Exception {
        assertEquals(2, new IntPair(4, 2).intDivision());
        assertEquals(0, new IntPair(1, 2).intDivision());
        assertEquals(0, new IntPair(0, 5).intDivision());
    }

    @Test
    public void intDivision_zeroDivisor_exceptionThrown() {
        try {
            assertEquals(0, new IntPair(1, 0).intDivision());
            fail(); // the test should not reach this line
        } catch (Exception e) {
            assertEquals("Divisor is zero", e.getMessage());
        }
    }
}
Notes:
- Each test method is marked with a
@Testannotation. - Tests use
Assert.assertEquals(expected, actual)methods to compare the expected output with the actual output. If they do not match, the test will fail. JUnit comes with other similar methods such asAssert.assertNullandAssert.assertTrue. - Java code normally use camelCase for method names e.g.,
testStringConversionbut when writing test methods, sometimes another convention is used:whatIsBeingTested_descriptionOfTestInputs_expectedOutcomee.g.,intDivision_zeroDivisor_exceptionThrown - There are several ways to verify the code throws the correct exception. The third test method in the example above shows one of the simpler methods. If the exception is thrown, it will be caught and further verified inside the
catchblock. But if it is not thrown as expected, the test will reachAssert.fail()line and will fail as a result. - The easiest way to run JUnit tests is to do it via the IDE. For example, in Intellij you can right-click the folder containing test classes and choose 'Run all tests...'
Adding JUnit 5 to your IntelliJ Project -- by Kevintroko@YouTube
Resources
- JUnit Official User Guide
- JUnit 5 Tutorial – Common Annotations With Examples - a short tutorial
- How to test private methods in Java? [ short answer ] [ long answer ]
Quality Assurance → Testing → Unit Testing → Stubs
Quality Assurance → Testing → Unit Testing → What →
Can use stubs to isolate an SUT from its dependencies
A proper unit test requires the unit to be tested in isolation so that bugs in the code the unit depends ondependencies cannot influence the test i.e. bugs outside of the unit should not affect the unit tests.
If a Logic class depends on a Storage class, unit testing the Logic class requires isolating the Logic class from the Storage class.
Stubs can isolate the Software Under Test (in this case, the unit being tested)SUT from its dependencies.
Stub: A stub has the same interface as the component it replaces, but its implementation is so simple that it is unlikely to have any bugs. It mimics the responses of the component, but only for a limited set of predetermined inputs. That is, it does not know how to respond to any other inputs. Typically, these mimicked responses are hard-coded in the stub rather than computed or retrieved from elsewhere, e.g. from a database.
Consider the code below:
class Logic {
    Storage s;

    Logic(Storage s) {
        this.s = s;
    }

    String getName(int index) {
        return "Name: " + s.getName(index);
    }
}
interface Storage {
    String getName(int index);
}
class DatabaseStorage implements Storage {

    @Override
    public String getName(int index) {
        return readValueFromDatabase(index);
    }

    private String readValueFromDatabase(int index) {
        // retrieve name from the database
    }
}
Normally, you would use the Logic class as follows (note how the Logic object depends on a DatabaseStorage object to perform the getName() operation):
Logic logic = new Logic(new DatabaseStorage());
String name = logic.getName(23);
You can test it like this:
@Test
void getName() {
    Logic logic = new Logic(new DatabaseStorage());
    assertEquals("Name: John", logic.getName(5));
}
However, this logic object being tested is making use of a DataBaseStorage object which means a bug in the DatabaseStorage class can affect the test. Therefore, this test is not testing Logic in isolation from its dependencies and hence it is not a pure unit test.
Here is a stub class you can use in place of DatabaseStorage:
class StorageStub implements Storage {

    @Override
    public String getName(int index) {
        if (index == 5) {
            return "Adam";
        } else {
            throw new UnsupportedOperationException();
        }
    }
}
Note how the StorageStub has the same interface as DatabaseStorage, but is so simple that it is unlikely to contain bugs, and is pre-configured to respond with a hard-coded response, presumably, the correct response DatabaseStorage is expected to return for the given test input.
Here is how you can use the stub to write a unit test. This test is not affected by any bugs in the DatabaseStorage class and hence is a pure unit test.
@Test
void getName() {
    Logic logic = new Logic(new StorageStub());
    assertEquals("Name: Adam", logic.getName(5));
}
In addition to Stubs, there are other type of replacements you can use during testing, e.g. Mocks, Fakes, Dummies, Spies.
Resources
- Mocks Aren't Stubs by Martin Fowler -- An in-depth article about how Stubs differ from other types of test helpers.
Exercises
Purpose of stubs
Stubs help us to test a component in isolation from its dependencies.
True
C++ to Java → JUnit → JUnit: Intermediate
Can use intermediate features of JUnit
Skim through the JUnit 5 User Guide to see what advanced techniques are available. If applicable, feel free to adopt them.