
Tool: Learning Management System
This module website is the main source of information for the module. In addition, we use LumiNUS for some things (e.g., webcasts, announcements, file submissions, grade book, ...).
Tool: Zoom (for Lectures)
Install Zoom in your computer. Installation and login instructions are here. Remember to login using your NUSNET account.
Tool: MS Teams (for In-Lecture Consultations)
Install MST in your computer. Installation and login instructions are here. Remember to login using your NUSNET account.
The MST team(s) used for the class (the code to join these teams will be given out during the lecture):
- for the 12-2pm lecture: CS2103_AY2021S1_12pm_lecture
- for the 4-6pm lecture: CS2103_AY2021S1_4pm_lecture
Tool: GitHub (for code hosting)
You are required to use GitHub as the hosting and collaboration platform of your project (i.e., to hold the Code repository, Issue Tracker, etc.).
Preparation:
Create a GitHub account (if you don't have one yet), as explained in the panel below.
Admin Appendix E - GitHub: Creating an Account
Create a personal GitHub account if you don't have one yet.
-
You are advised to choose a sensible GitHub username as you are likely to use it for years to come in professional contexts e.g., in job applications.
-
Strongly recommended: Complete your GitHub profile. In particular,
- Specify your full name.
- Upload a profile photo that matches our requirements.
Why am I being encouraged to complete my GitHub profile?
The GitHub profile is useful for the tutors and classmates to identify you. If you are reluctant to share your info in your long-term GitHub account, you can remove those details after the module is over or create a separate GitHub account just for the module.
-
You are discouraged from changing your GitHub username during the semester/exam/grading period as it can cause our auto-grading scripts to miss your GitHub activities. If you do change your GitHub username during that period, please let us know immediately.
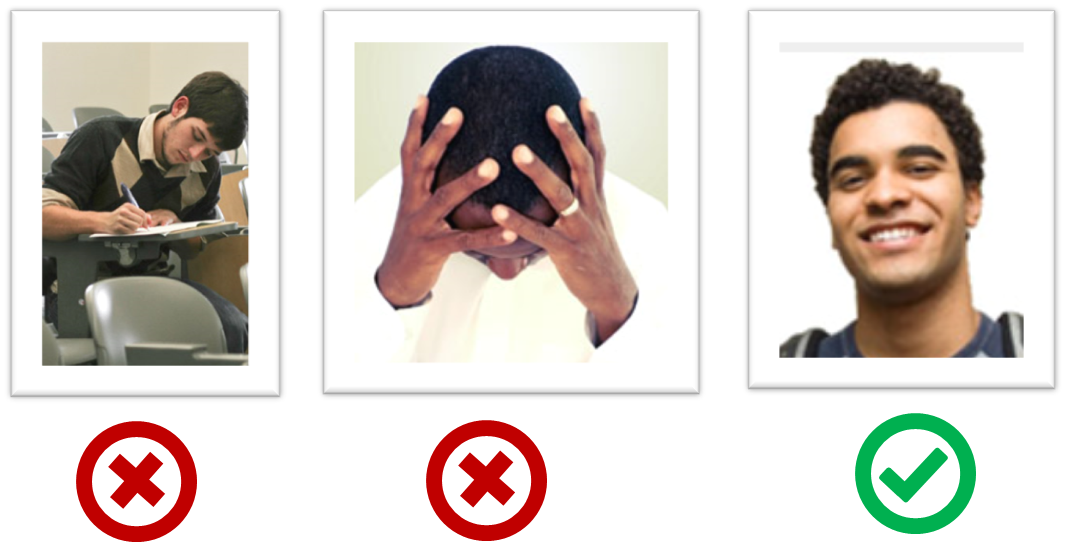
The purpose of the profile photo is for the reader to identify you. Therefore, choose a recent individual photo showing your face clearly (i.e., not too small) -- somewhat similar to a passport photo. Given below are some examples of good and bad profile photos.
If you are uncomfortable posting your photo due to security reasons, you can post a lower resolution image so that it is hard for someone to misuse that image for fraudulent purposes. If you are concerned about privacy, you may use a placeholder image in place of the photo in module-related documents that are publicly visible.
More info: See Appendix E - Using GitHub.
Tool: Git (for revision control)
You are required to use Git. Other revision control software are not allowed. The recommended GUI client for Git is SourceTree, but you may use any other, or none.
Preparation:
Install Git and a Git GUI client on your computer.
SourceTree comes bundled with Git i.e., if you install SourceTree, you get both Git and a GUI client in one shot. If you are already comfortable using Git command line, you need not install/use a GUI client.
Set Git user.name: We use various tools to analyze your code. For us to be able to identify your commits, we encourage you to set your Git user.name in all computers you use to a sensible string that uniquely identifies you. For example, you can set it to your GitHub username or your full name. If this user name is not set properly or if you use multiple usernames for Git, our grading scripts might miss some of your work.
After installing Git in a computer, you can set the Git username as follows:
- Open a command window that can run Git commands (e.g., Git bash window)
- Run the command
git config --global user.name YOUR_GITHUB_USERNAME(omit the--globalflag to limit the setting to the current repo only)
e.g.,git config --global user.name JohnDoe
More info about setting Git username is here.
Tools: for communication
Forum (for longer-running discussions)
- The preferred channels for module-related communication is the
forumon GitHub https://github.com/nus-cs2103-AY2021S1/forum/issues (not the LumiNUS forum) - When communicating with instructors, use the forum. Use private channels (e.g., emails, private messages, face-to-face, private chat groups) only when the forum is not suitable. Rationale: 1. More classmates can benefit from the discussions, 2. It is also safer because the prof can monitor information you receive for accuracy.
- You are encouraged to help others in the forum (e.g., share tips, help with technical problems). We consider such sharing when giving out
A+grades and when recruiting tutors.
Preparation:
We encourage all to watch the forum to get alerts when new issues/comments are posted 
Gitter (for quick chats)
- The module Gitter channel is https://gitter.im/nus-cs2103-AY2021S1/community.
- We opted to use Gitter because it is GitHub-friendly (you can use your GitHub account to access Gitter) and programmer-friendly (e.g., supports code syntax highlighting).
- Do not use Gitter for technical help requests. Such requests can lead to long-running discussions which are better suited for the forum.
Preparation:
- Join https://gitter.im/nus-cs2103-AY2021S1/community.
- Recommended: Install the Gitter mobile app (search for it in your mobile phone's app store).
Tool: Intellij IDE
You are recommended to use Intellij IDEA for module-related programming work. While the use of Intellij is not compulsory, note that module materials are optimized for Intellij. Use other IDEs at your own risk.
Preparation:
- Install the IDE in your computer. You may use the Intellij community edition (free) or the ultimate edition (free for students).
- If you have an older version of the IDE, we recommend updating to the latest version.
Tool: RepoSense (for authorship tracking)
We will be using a tool called RepoSense to make it easier for you to see (and learn from) code written by others, and to help us see who wrote which part of the code.
Viewing the current status of code authorship data:
- The reports generated by the tool for the individual and team projects will be made available in the module website at some point in the semester. The feature that is most relevant to you is the Code Panel (shown on the right side of the screenshot above). It shows the code attributed to a given author.
- Click on your name to load the code attributed to you (based on Git blame/log data) onto the code panel on the right.
- If the code shown roughly matches the code you wrote, all is fine and there is nothing for you to do.
If the code does not match the actual authorship: Given below are the possible reasons for the code shown to mismatch the code you wrote.
-
Reason 1: the
Author nameof some of your commits is not known to RepoSense -- this is a result of not setting thegit.usernameproperty as instructed in our Git setup instructions.
How to check: Find theAuthor nameof your commits that are missing (you can use SourceTree or thegit logcommand for that -- it's not possible to do that using the GitHub interface though).
Check if that author name is included in the RepoSense config for the iP or the RepoSense config for the tP (whichever the applicable one)
Remedy: Send the missing author name(s) to the prof so that the RepoSense configuration can be updated accordingly. -
Reason 2: The actual authorship does not match the authorship determined by git blame/log e.g., another student touched your code after you wrote it, and Git log attributed the code to that student instead.
Remedy: You can add@@authorannotations as explained in the panel below:
Adding @@author tags to indicate authorship
Adding @@author tags indicate authorship
-
Mark your code with a
//@@author {yourGithubUsername}. Note the double@.
The//@@authortag should indicates the beginning of the code you wrote. The code up to the next//@@authortag or the end of the file (whichever comes first) will be considered as was written by that author. Here is a sample code file://@@author johndoe
method 1 ...
method 2 ...
//@@author sarahkhoo
method 3 ...
//@@author johndoe
method 4 ... -
If you don't know who wrote the code segment below yours, you may put an empty
//@@author(i.e. no GitHub username) to indicate the end of the code segment you wrote. The author of code below yours can add the GitHub username to the empty tag later. Here is a sample code with an emptyauthortag:method 0 ...
//@@author johndoe
method 1 ...
method 2 ...
//@@author
method 3 ...
method 4 ... -
The author tag syntax varies based on file type e.g. for java, css, fxml. Use the corresponding comment syntax for non-Java files.
Here is an example code from an xml/fxml file.<!-- @@author sereneWong -->
<textbox>
<label>...</label>
<input>...</input>
</textbox>
... -
Do not put the
//@@authorinside java header comments.
👎/**
* Returns true if ...
* @@author johndoe
*/👍
//@@author johndoe
/**
  * Returns true if ...
  */
What to and what not to annotate
-
Annotate both functional and test code There is no need to annotate documentation files.
-
Annotate only significant size code blocks that can be reviewed on its own e.g., a class, a sequence of methods, a method.
Claiming credit for code blocks smaller than a method is discouraged but allowed. If you do, do it sparingly and only claim meaningful blocks of code such as a block of statements, a loop, or an if-else statement.- If an enhancement required you to do tiny changes in many places, there is no need to annotate all those tiny changes; you can describe those changes in the Project Portfolio page instead.
- If a code block was touched by more than one person, either let the person who wrote most of it (e.g. more than 80%) take credit for the entire block, or leave it as 'unclaimed' (i.e., no author tags).
- Related to the above point, if you claim a code block as your own, more than 80% of the code in that block should have been written by yourself. For example, no more than 20% of it can be code you reused from somewhere.
- GitHub has a blame feature and a history feature that can help you determine who wrote a piece of code.
-
Do not try to boost the quantity of your contribution using unethical means such as duplicating the same code in multiple places. In particular, do not copy-paste test cases to create redundant tests. Even repetitive code blocks within test methods should be extracted out as utility methods to reduce code duplication. Individual members are responsible for making sure code attributed to them are correct. If you notice a team member claiming credit for code that he/she did not write or use other questionable tactics, you can email us (after the final submission) to let us know.
-
If you wrote a significant amount of code that was not used in the final product,
- Create a folder called
{project root}/unused - Move unused files (or copies of files containing unused code) to that folder
- use
//@@author {yourGithubUsername}-unusedto mark unused code in those files (note the suffixunused) e.g.
//@@author johndoe-unused
method 1 ...
method 2 ...
Please put a comment in the code to explain why it was not used.
- Create a folder called
-
If you reused code from elsewhere, mark such code as
//@@author {yourGithubUsername}-reused(note the suffixreused) e.g.//@@author johndoe-reused
method 1 ...
method 2 ... -
You can use empty
@@authortags to mark code as not yours when RepoSense attribute the code to you incorrectly.-
Code generated by the IDE/framework, should not be annotated as your own.
-
Code you modified in minor ways e.g. adding a parameter. These should not be claimed as yours but you can mention these additional contributions in the Project Portfolio page if you want to claim credit for them.
-
- Reason 3: Some commits should not be included in the authorship analysis e.g., you committed the code of a third party library by mistake.
Remedy: Let us know the hashes of the commits that need to be omitted from the analysis.
If none of the above works, please please post in the forum or contact us via cs2103@comp.nus.edu.sg so that we can advise you what to do.
We recommend you ensure your code is RepoSense-compatible by v1.3
Tool: TEAMMATES (for Peer Evaluations)
We use the TEAMMATES online peer evaluation system. TEAMMATES is a project run by NUS SoC students and used by over 0.5 million users from over 1000 universities.
Preparation: When the first feedback session is open on TEAMMATES, you will receive an eamil from TEAMMATES. There is nothing for you to do until then.
When you do receive that email, it will contain a unique link that you can use to access TEAMMATES without logging in first. Logging in to TEAMMATES using a Google account is optional (but doing so will allow you to see all your TEAMMATES sessions in one page).