- Do a practice iteration midnight before the tutorial
- Update project website:
AboutUs,README - Update the UG
- Update the DG: user stories, glossary, NFRs, use cases
- Plan the next iteration
- Start implementing the next version
1 Do a practice iteration midnight before the tutorial
- To get some practice of doing project iterations, do this week's tP work (i.e., updates to various documents) as if it is a project iteration that will reach a milestone
v1.1, as explained in the pane below.
Admin Appendix E(extract): Project schedule tracking
tP Project Schedule Tracking
In general, use the issue tracker (Milestones, Issues, PRs, Tags, Releases, and Labels) for assigning, scheduling, and tracking all noteworthy project tasks, including user stories. Update the issue tracker regularly to reflect the current status of the project. You can also use GitHub's Projects feature to manage the project, but keep it linked to the issue tracker as much as you can.
Using Issues:
- Record each of the user stories you plan to deliver as an issue in the issue tracker. e.g.,
You can break the user story into issue subject and description in this way:
| title | As a user I can add a deadline |
|---|---|
| Description | ... so that I can keep track of my deadlines |
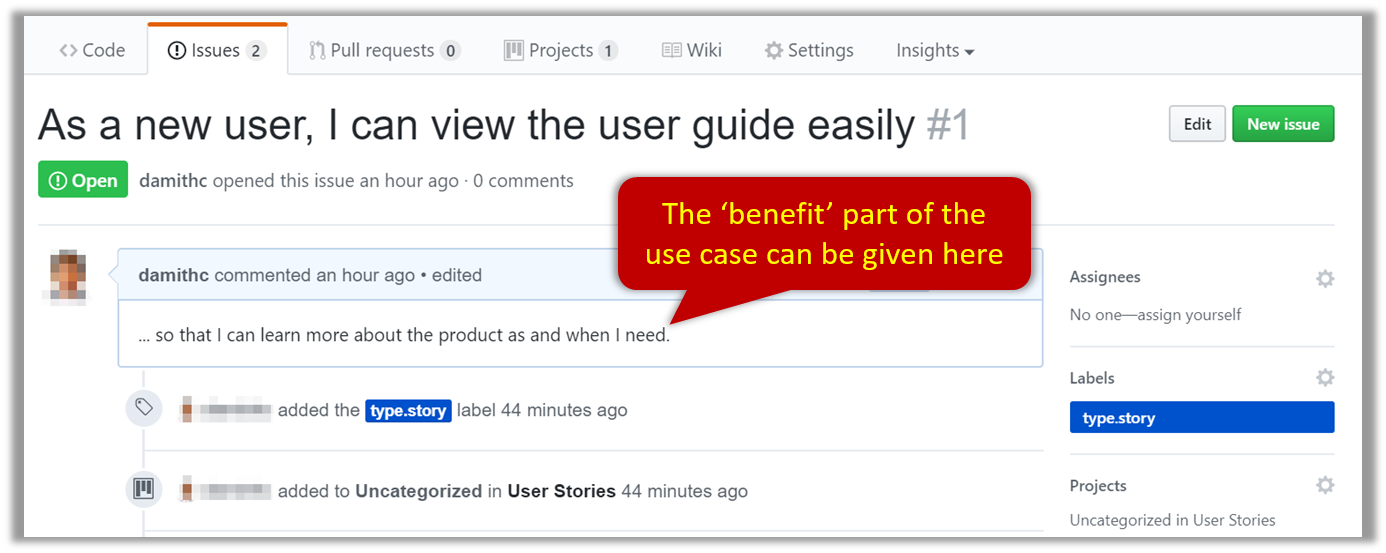
Alternatively, you can put the entire user story in the description.
| title | Add deadline |
|---|---|
| Description | As a user I can so that I can keep track of my deadlines |
In both cases, apply the type.Story label.
-
Assign the
type.*andpriority.*labels to those issues. -
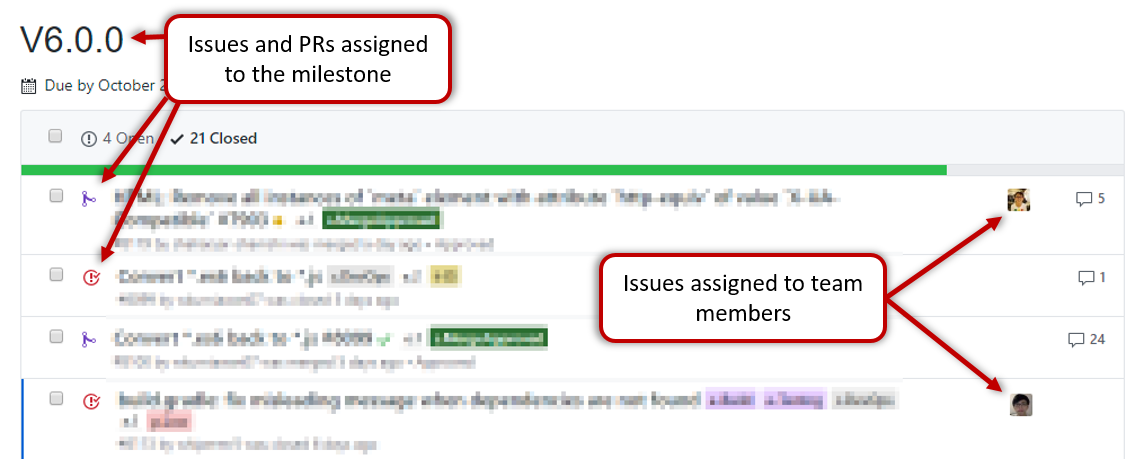
Formalize the project plan by assigning relevant issues to the corresponding milestone.
-
Define project tasks as issues. When you start implementing a user story (or a feature), break it down to smaller tasks if necessary. Define reasonable sized, standalone tasks. Create issues for each of those tasks so that they can be tracked.
-
A typical task should be small enough for one person to do in a few hours. eg.,
- Bad (reasons: not a one-person task, not small enough):
Write the Developer Guide - Good:
Update class diagram in the Developer Guide for v1.4
- Bad (reasons: not a one-person task, not small enough):
-
There is no need to break things into VERY small tasks. Keep them as big as possible, but they should be no bigger than what you are going to assign a single person to do within a week. eg.,
- Bad:
Implementing parser(reason: too big). - Good:
Implementing parser support for adding of floating tasks
- Bad:
-
Do not track things taken for granted. e.g.,
push code to reposhould not be a task to track. In the example given under the previous point, it is taken for granted that the owner will also (a) test the code and (b) push to the repo when it is ready. Those two need not be tracked as separate tasks. -
Write a descriptive title for the issue. e.g.
Add support for the 'undo' command to the parser- Omit redundant details. In some cases, the issue title is enough to describe the task. In that case, no need to repeat it in the issue description. There is no need for well-crafted and detailed descriptions for tasks. A minimal description is enough. Similarly, labels such as
prioritycan be omitted if you think they don't help you.
- Omit redundant details. In some cases, the issue title is enough to describe the task. In that case, no need to repeat it in the issue description. There is no need for well-crafted and detailed descriptions for tasks. A minimal description is enough. Similarly, labels such as
-
-
Assign tasks (i.e., issues) to the corresponding team members using the
assigneesfield. Normally, there should be some ongoing tasks and some pending tasks against each team member at any point.
Using Milestones:
Given below are the conditions to satisfy for a milestone to be considered properly managed:
Planning a Milestone (to do within the first week of the iteration):
-
Issues assigned to the milestone, team members assigned to issues: Used GitHub milestones to indicate which issues are to be handled for which milestone by assigning issues to suitable milestones. Ensured issues are assigned to team members. Note that you can change the milestone plan along the way as necessary.
-
Deadline set for the milestones (in the GitHub milestone). Your internal milestones can be set earlier than the deadlines we have set, to give you a buffer.
Wrapping up a Milestone:
-
A working product tagged with the correct tag (e.g.
v1.3) and is pushed to the main repo or a product release done on GitHub (example). -
CI passing for the version tagged/released.
-
Milestone updated to match the product i.e. all issues completed and PRs merged for the milestone should be assigned to the milestone. Incomplete issues/PRs should be moved to a future milestone.
-
Milestone closed.
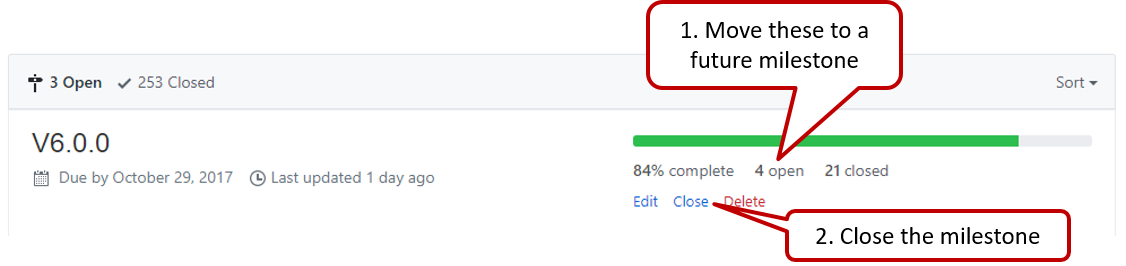
- Don't forget to 'wrap up' the milestone at the end of this week (as explained in the panel above), after the work is done.
2 Update project website: AboutUs, README
Recommended procedure for updating docs:
- Divide among yourselves who will update which parts of the document(s).
- Update the team repo by following the recommended workflow.
Admin Appendix E(extract): Workflow
Read our reuse policy (in Admin: Appendix B), in particular, how to give credit when you reuse code from the Internet or classmates:
Set Git user.name: We use various tools to analyze your code. For us to be able to identify your commits, we encourage you to set your Git user.name in all computers you use to a sensible string that uniquely identifies you. For example, you can set it to your GitHub username or your full name. If this user name is not set properly or if you use multiple usernames for Git, our grading scripts might miss some of your work.
After installing Git in a computer, you can set the Git username as follows:
- Open a command window that can run Git commands (e.g., Git bash window)
- Run the command
git config --global user.name YOUR_GITHUB_USERNAME(omit the--globalflag to limit the setting to the current repo only)
e.g.,git config --global user.name JohnDoe
More info about setting Git username is here.
Policy on reuse
Reuse is encouraged. However, note that reuse has its own costs (such as the learning curve, additional complexity, usage restrictions, and unknown bugs). Furthermore, you will not be given credit for work done by others. Rather, you will be given credit for reusing work done by others.
- You are allowed to reuse work from your classmates, subject to following conditions:
- The work has been shared publicly by us or the authors.
- You clearly give credit to the original author(s).
- You are allowed to reuse work from external sources, subject to following conditions:
- The work comes from a source of 'good standing' (such as an established open source project). This means you cannot reuse code written by an outside 'friend'.
- You clearly give credit to the original author. Acknowledge use of third party resources clearly e.g. in the welcome message, splash screen (if any) or under the 'about' menu. If you are open about reuse, you are less likely to get into trouble if you unintentionally reused something copyrighted.
- You do not violate the license under which the work has been released. Please do not use 3rd-party images/audio in your software unless they have been specifically released to be used freely. Just because you found it in the Internet does not mean it is free for reuse.
- Always get permission from us before you reuse third-party libraries. Please post your 'request to use 3rd party library' in our forum. That way, the whole class get to see what libraries are being used by others.
Giving credit for reused work
Given below are how to give credit for things you reuse from elsewhere. These requirements are specific to this module i.e., not applicable outside the module (outside the module you should follow the rules specified by your employer and the license of the reused work)
If you used a third party library:
- iP/tP: Mention in the
READMEfile (under the Acknowledgements section) - tP: Mention in the Project Portfolio Page if the library has a significant relevance to the features you implemented
If you reused code snippets found on the Internet e.g. from StackOverflow answers or
referred code in another software or
referred project code by current/past student:
- If you read the code to understand the approach and implemented it yourself, mention it as a comment
Example://Solution below adapted from https://stackoverflow.com/a/16252290
{Your implmentation of the reused solution here ...} - If you copy-pasted a non-trivial code block (possibly with minor modifications renaming, layout changes, changes to comments, etc.), also mark the code block as reused code (using
@@authortags with the-reusedsuffix)
Format://@@author {yourGithubUsername}-reused
//{Info about the source...}
{Reused code (possibly with minor modifications) here ...}
//@@authorpersons = getList()
//@@author johndoe-reused
//Reused from https://stackoverflow.com/a/34646172 with minor modifications
Collections.sort(persons, new Comparator<CustomData>() {
@Override
public int compare(CustomData lhs, CustomData rhs) {
return lhs.customInt > rhs.customInt ? -1 : 0;
}
});
//@@author
return persons;
Giving credit to AB3 code: If your project started with the AB3 code and your new code follows a design similar to AB3, that doesn't mean you need to credit AB3 -- this is because new code is expected to follow existing code where possible, in the interest of consistency. However, don't take credit for existing AB3 code (i.e., ensure such code doesn't appear under your name in the tP code dashboard) unless you have modified them substantially.
Adding @@author tags indicate authorship
-
Mark your code with a
//@@author {yourGithubUsername}. Note the double@.
The//@@authortag should indicates the beginning of the code you wrote. The code up to the next//@@authortag or the end of the file (whichever comes first) will be considered as was written by that author. Here is a sample code file://@@author johndoe
method 1 ...
method 2 ...
//@@author sarahkhoo
method 3 ...
//@@author johndoe
method 4 ... -
If you don't know who wrote the code segment below yours, you may put an empty
//@@author(i.e. no GitHub username) to indicate the end of the code segment you wrote. The author of code below yours can add the GitHub username to the empty tag later. Here is a sample code with an emptyauthortag:method 0 ...
//@@author johndoe
method 1 ...
method 2 ...
//@@author
method 3 ...
method 4 ... -
The author tag syntax varies based on file type e.g. for java, css, fxml. Use the corresponding comment syntax for non-Java files.
Here is an example code from an xml/fxml file.<!-- @@author sereneWong -->
<textbox>
<label>...</label>
<input>...</input>
</textbox>
... -
Do not put the
//@@authorinside java header comments.
👎/**
* Returns true if ...
* @@author johndoe
*/👍
//@@author johndoe
/**
  * Returns true if ...
  */
What to and what not to annotate
-
Annotate both functional and test code There is no need to annotate documentation files.
-
Annotate only significant size code blocks that can be reviewed on its own e.g., a class, a sequence of methods, a method.
Claiming credit for code blocks smaller than a method is discouraged but allowed. If you do, do it sparingly and only claim meaningful blocks of code such as a block of statements, a loop, or an if-else statement.- If an enhancement required you to do tiny changes in many places, there is no need to annotate all those tiny changes; you can describe those changes in the Project Portfolio page instead.
- If a code block was touched by more than one person, either let the person who wrote most of it (e.g. more than 80%) take credit for the entire block, or leave it as 'unclaimed' (i.e., no author tags).
- Related to the above point, if you claim a code block as your own, more than 80% of the code in that block should have been written by yourself. For example, no more than 20% of it can be code you reused from somewhere.
- GitHub has a blame feature and a history feature that can help you determine who wrote a piece of code.
-
Do not try to boost the quantity of your contribution using unethical means such as duplicating the same code in multiple places. In particular, do not copy-paste test cases to create redundant tests. Even repetitive code blocks within test methods should be extracted out as utility methods to reduce code duplication. Individual members are responsible for making sure code attributed to them are correct. If you notice a team member claiming credit for code that he/she did not write or use other questionable tactics, you can email us (after the final submission) to let us know.
-
If you wrote a significant amount of code that was not used in the final product,
- Create a folder called
{project root}/unused - Move unused files (or copies of files containing unused code) to that folder
- use
//@@author {yourGithubUsername}-unusedto mark unused code in those files (note the suffixunused) e.g.
//@@author johndoe-unused
method 1 ...
method 2 ...
Please put a comment in the code to explain why it was not used.
- Create a folder called
-
If you reused code from elsewhere, mark such code as
//@@author {yourGithubUsername}-reused(note the suffixreused) e.g.//@@author johndoe-reused
method 1 ...
method 2 ... -
You can use empty
@@authortags to mark code as not yours when RepoSense attribute the code to you incorrectly.-
Code generated by the IDE/framework, should not be annotated as your own.
-
Code you modified in minor ways e.g. adding a parameter. These should not be claimed as yours but you can mention these additional contributions in the Project Portfolio page if you want to claim credit for them.
-
At the end of the project each student is required to submit a Project Portfolio Page.
PPP Objectives
- For you to use (e.g. in your resume) as a well-documented data point of your SE experience
- For evaluators to use as a data point for evaluating your project contributions
PPP Sections to include
- Overview: A short overview of your product to provide some context to the reader. The opening 1-2 sentences may be reused by all team members. If your product overview extends beyond 1-2 sentences, the remainder should be written by yourself.
- Summary of Contributions --Suggested items to include:
- Code contributed: Give a link to your code on tP Code Dashboard. The link is available in the Project List Page -- linked to the icon under your profile picture.
- Enhancements implemented: A summary of the enhancements you implemented.
- Contributions to documentation: Which sections did you contribute to the UG?
- Contributions to the DG: Which sections did you contribute to the DG? Which UML diagrams did you add/updated?
- Contributions to team-based tasks :
- Review/mentoring contributions: Links to PRs reviewed, instances of helping team members in other ways
- Contributions beyond the project team:
- Evidence of helping others e.g. responses you posted in our forum, bugs you reported in other team's products,
- Evidence of technical leadership e.g. sharing useful information in the forum
Team-tasks are the tasks that someone in the team has to do.
Examples of team-tasks
Here is a non-exhaustive list of team-tasks:
- Setting up the GitHub team org/repo
- Necessary general code enhancements e.g.,
- Work related to renaming the product
- Work related to changing the product icon
- Morphing the product into a different product
- Setting up tools e.g., GitHub, Gradle
- Maintaining the issue tracker
- Release management
- Updating user/developer docs that are not specific to a feature e.g. documenting the target user profile
- Incorporating more useful tools/libraries/frameworks into the product or the project workflow (e.g. automate more aspects of the project workflow using a GitHub plugin)
Keep in mind that evaluators will use the PPP to estimate your project effort. We recommend that you mention things that will earn you a fair score e.g., explain how deep the enhancement is, why it is complete, how hard it was to implement etc..
- [Optional] Contributions to the Developer Guide (Extracts): Reproduce the parts in the Developer Guide that you wrote. Alternatively, you can show the various diagrams you contributed.
- [Optional] Contributions to the User Guide (Extracts): Reproduce the parts in the User Guide that you wrote.
PPP Format
- File name (i.e., in the repo):
docs/team/githbub_username_in_lower_case.mde.g.,docs/team/goodcoder123.md - Follow the example in the AddressBook-Level3
To convert the UG/DG/PPP into PDF format, go to the generated page in your project's github.io site and use this technique to save as a pdf file. Using other techniques can result in poor quality resolution (will be considered a bug) and unnecessarily large files.
Ensure hyperlinks in the pdf files work. Your UG/DG/PPP will be evaluated using PDF files during the PE. Broken/non-working hyperlinks in the PDF files will be considered as bugs and will count against your project score. Again, use the conversion technique given above to ensure links in the PDF files work.
The icon indicates team submissions. Only one person need to submit on behalf of the team but we recommend that others help verify the submission is in order i.e., the responsibility for (and any penalty for problems in) team submissions are best shared by the whole team rather than burden one person with it.
The icon indicates individual submissions.
PPP Page Limit
| Content | Recommended | Hard Limit |
|---|---|---|
| Overview + Summary of contributions | 0.5-1 | 2 |
| [Optional] Contributions to the User Guide | 1 | |
| [Optional] Contributions to the Developer Guide | 3 |
- The page limits given above are after converting to PDF format. The actual amount of content you require is actually less than what these numbers suggest because the HTML → PDF conversion adds a lot of spacing around content.
Follow the forking workflow in your project at least until (and including) v1.2 (you may tweak the workflow v1.3 onwards).
- Protect the
masterbranch: You can use GitHub's Protected Branches feature to protect yourmasterbranch against rogue PRs. We suggest the following:- Go the the settings of your team repo.
- Click on the
Branchesoption on the navigation menu on the left. - Click the button. In the Branch protection rule page,
- Specify the Branch name pattern to be
master - Tick the option
Require status checks to pass before mergingto ensure that a branch has to pass CI before it can be merged into themasterbranch - If you think all PRs should be reviewed by someone other than the PR author before they are merged, also tick the
Require pull request reviews before mergingoption.
- Specify the Branch name pattern to be
- Create issues to represent project tasks so that they can be tracked using the issue tracker features.
- Create a PR when you implement a project task that updates the code. Remember to use a separate branch for each PR.
You can use GitHub's draft PRs feature to indicate that a PR is not yet ready for merging. - Get team members to review PRs. A workflow without PR reviews is a risky workflow.
- Follow the Best practices for reviewing PRs @SE-EDU/guides.
PRO TIPLGTMis common abbreviation you can use in the review comments to meanLooks Good To Merge.
- Follow the Best practices for reviewing PRs @SE-EDU/guides.
- Go breadth-first iterative: As you are expected to follow breadth-first iterative approach, almost all code additions to the
masterbranch should take the product from a working version to a slightly better working version.- Bad Let's add all data classes first reason: this is the depth-first approach
- Bad Let's finish the part of the code that saves and loads data first reason: this is the depth-first approach
- Good Let's add code to support simple todo tasks first (i.e., read, delete, save, load)
- Do not merge PRs failing Continuous Integration e.g., GitHub ActionsCI. The CI status of a PR is reported at the bottom of the conversation tab of the PR page. Here's an example:
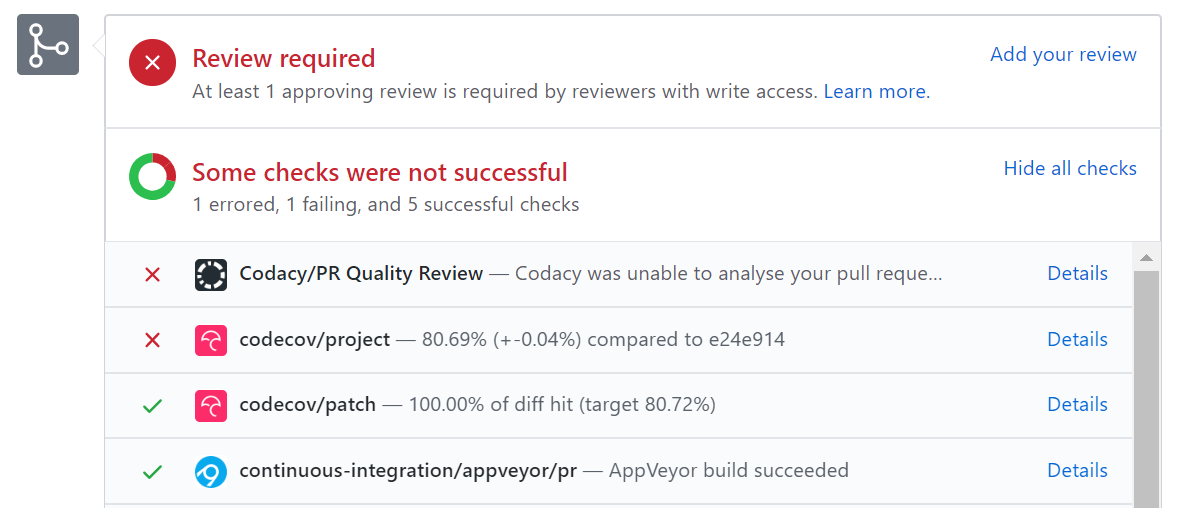
- If there is a failure, you can click on the
Detailslink in corresponding line to find out more about the failure. Once you figure out the cause of the failure, push the a fix to the PR.
- If there is a failure, you can click on the
- After merging a PR,
- close the corresponding issue.
PRO TIP You can use GitHub'sFixes #123trick to get the issue to close automatically when the PR is merged. - sync your repos with the team rep by pulling the latest
masterfrom the team repo and pushing it to your own fork.
- close the corresponding issue.
Project Management → Revision Control →
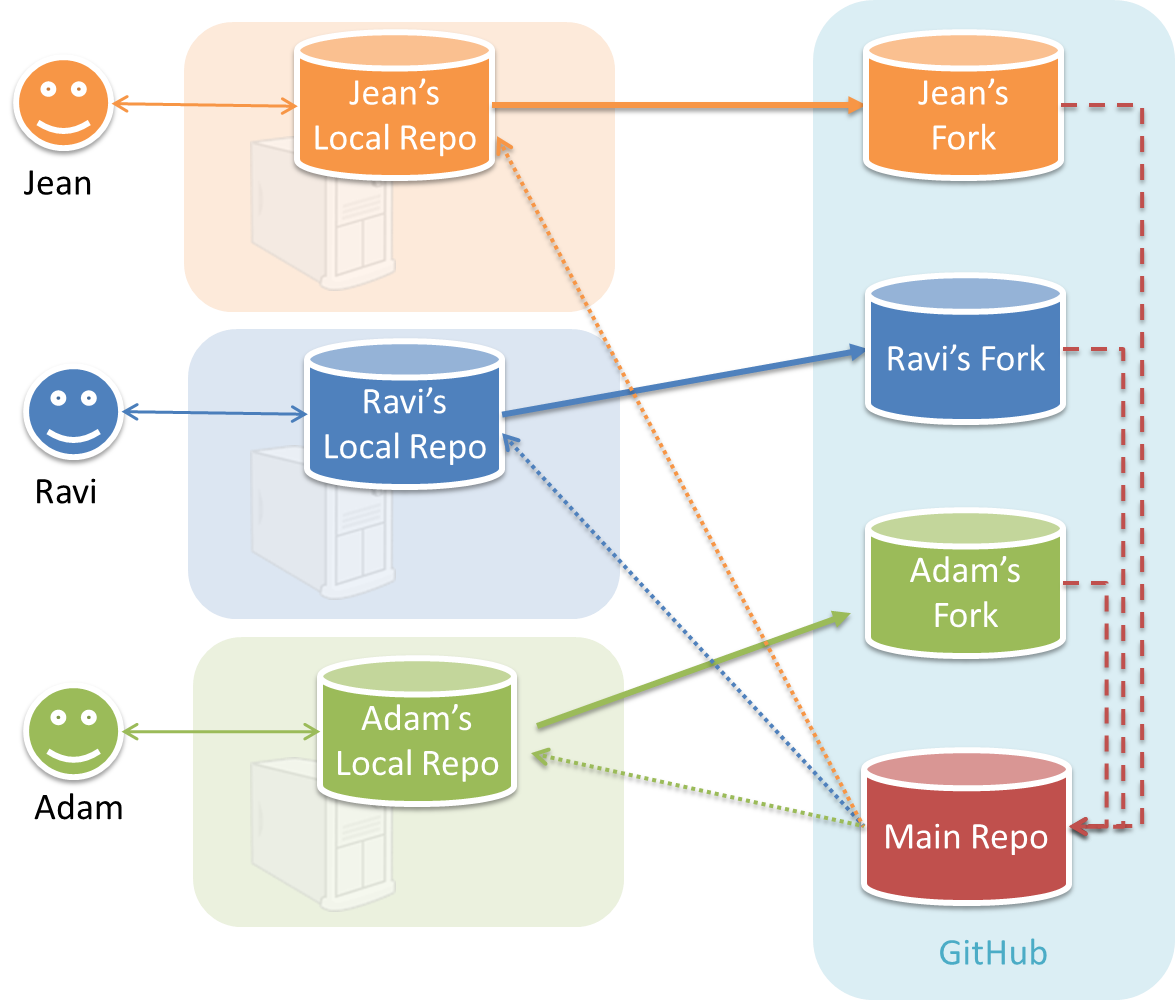
In the forking workflow, the 'official' version of the software is kept in a remote repo designated as the 'main repo'. All team members fork the main repo and create pull requests from their fork to the main repo.
To illustrate how the workflow goes, let’s assume Jean wants to fix a bug in the code. Here are the steps:
- Jean creates a separate branch in her local repo and fixes the bug in that branch.
Common mistake: Doing the proposed changes in themasterbranch -- if Jean does that, she will not be able to have more than one PR open at any time because any changes to themasterbranch will be reflected in all open PRs. - Jean pushes the branch to her fork.
- Jean creates a pull request from that branch in her fork to the main repo.
- Other members review Jean’s pull request.
- If reviewers suggested any changes, Jean updates the PR accordingly.
- When reviewers are satisfied with the PR, one of the members (usually the team lead or a designated 'maintainer' of the main repo) merges the PR, which brings Jean’s code to the main repo.
- Other members, realizing there is new code in the upstream repo, sync their forks with the new upstream repo (i.e. the main repo). This is done by pulling the new code to their own local repo and pushing the updated code to their own fork.
Possible mistake: Creating another 'reverse' PR from the team repo to the team member's fork to sync the member's fork with the merged code. PRs are meant to go from downstream repos to upstream repos, not in the other direction.
Resources
- A detailed explanation of the Forking Workflow - From Atlassian
Revision Control → Forking Workflow
Tools → Git and GitHub →
You can follow the steps in the simulation of a forking workflow given below to learn how to follow such a workflow.
This activity is best done as a team.
Step 1. One member: set up the team org and the team repo.
-
Create a GitHub organization for your team. The org name is up to you. We'll refer to this organization as team org from now on.
-
Add a team called
developersto your team org. -
Add team members to the
developersteam. -
Fork se-edu/samplerepo-workflow-practice to your team org. We'll refer to this as the team repo.
-
Add the forked repo to the
developersteam. Give write access.
Step 2. Each team member: create PRs via own fork.
-
Fork that repo from your team org to your own GitHub account.
-
Create a branch named
add-{your name}-info(e.g.add-johnTan-info) in the local repo. -
Add a file
yourName.mdinto themembersdirectory (e.g.,members/jonhTan.md) containing some info about you into that branch. -
Push that branch to your fork.
-
Create a PR from that branch to the
masterbranch of the team repo.
Step 3. For each PR: review, update, and merge.
-
[A team member (not the PR author)] Review the PR by adding comments (can be just dummy comments).
-
[PR author] Update the PR by pushing more commits to it, to simulate updating the PR based on review comments.
-
[Another team member] Approve and merge the PR using the GitHub interface.
-
[All members] Sync your local repo (and your fork) with upstream repo. In this case, your upstream repo is the repo in your team org.
Step 4. Create conflicting PRs.
-
[One member]: Update README: In the
masterbranch, remove John Doe and Jane Doe from theREADME.md, commit, and push to the main repo. -
[Each team member] Create a PR to add yourself under the
Team Memberssection in theREADME.md. Use a new branch for the PR e.g.,add-johnTan-name.
Step 5. Merge conflicting PRs one at a time. Before merging a PR, you’ll have to resolve conflicts.
-
[Optional] A member can inform the PR author (by posting a comment) that there is a conflict in the PR.
-
[PR author] Resolve the conflict locally:
- Pull the
masterbranch from the repo in your team org. - Merge the pulled
masterbranch to your PR branch. - Resolve the merge conflict that crops up during the merge.
- Push the updated PR branch to your fork.
- Pull the
-
[Another member or the PR author]: Merge the de-conflicted PR: When GitHub does not indicate a conflict anymore, you can go ahead and merge the PR.
Update the following pages in your project repo:
- AboutUs page:
This page (in the
/docsfolder) is used for module admin purposes. Please follow the format closely or else our scripts will not be able to give credit for your work.- Add your own details. Include a suitable photo as described here.
- Including the the supervisor/lecturer is optional.
- The filename of the profile photo should be
doc/images/githbub_username_in_lower_case.png
Note the need for lower case (GitHub usernames are not case sensitive, but URLs in GitHub-pages are -- to avoid any mismatches, we have fixed the file name here to be lower casewhy lowercase?) e.g.JohnDoe123->docs/images/johndoe123.png.
If your photo is in jpg format, name the file as.pnganyway. - Indicate the different roles played and responsibilities held by each team member. You can reassign these roles and responsibilities (as explained in Admin Project Scope) later in the project, if necessary.
The purpose of the profile photo is for the reader to identify you. Therefore, choose a recent individual photo showing your face clearly (i.e., not too small) -- somewhat similar to a passport photo. Given below are some examples of good and bad profile photos.
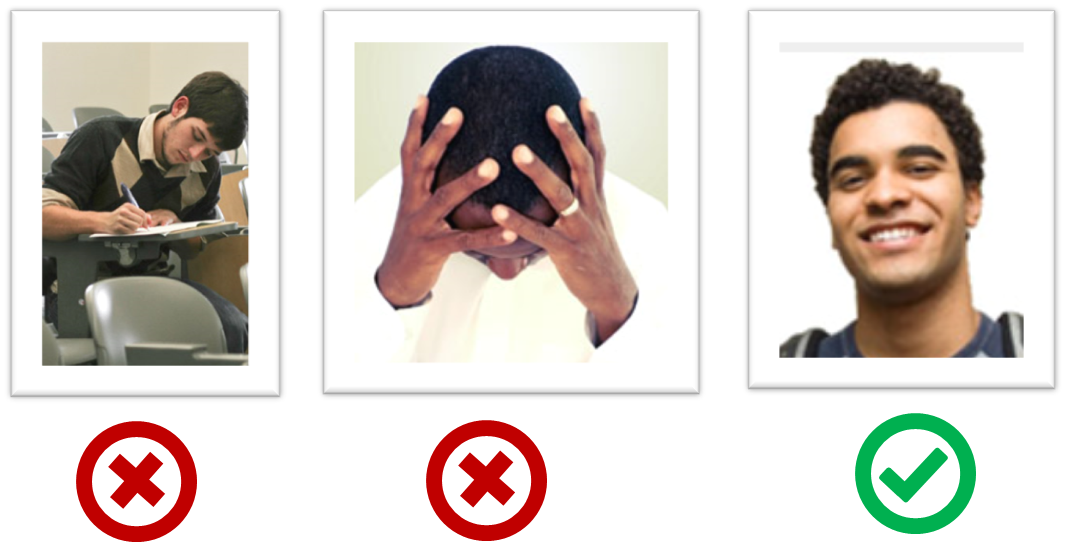
If you are uncomfortable posting your photo due to security reasons, you can post a lower resolution image so that it is hard for someone to misuse that image for fraudulent purposes. If you are concerned about privacy, you may use a placeholder image in place of the photo in module-related documents that are publicly visible.
Roles indicate aspects you are in charge of and responsible for. E.g., if you are in charge of documentation, you are the person who should allocate which parts of the documentation is to be done by who, ensure the document is in right format, ensure consistency etc.
Recommended roles and responsibilities
This is a non-exhaustive list; you may define additional roles.
- Team lead: Responsible for overall project coordination.
- Documentation (short for ‘in charge of documentation’): Responsible for the quality of various project documents.
- Testing: Ensures the testing of the project is done properly and on time.
- Code quality: Looks after code quality, ensures adherence to coding standards, etc.
- Deliverables and deadlines: Ensure project deliverables are done on time and in the right format.
- Integration: In charge of versioning of the code, maintaining the code repository, integrating various parts of the software to create a whole.
- Scheduling and tracking: In charge of defining, assigning, and tracking project tasks.
- [Tool ABC] expert: e.g. Intellij expert, Git expert, etc. Helps other team member with matters related to the specific tool.
- In charge of[Component XYZ]: e.g. In charge of
Model,UI,Storage, etc. If you are in charge of a component, you are expected to know that component well, and review changes done to that component in v1.3-v1.4.
Ensure each of the important roles are assigned to one person in the team. It is OK to have a 'backup' for each role, but for each aspect there should be one person who is unequivocally the person responsible for it. Reason: when everyone is responsible for everything, no one is.
-
README page: Update it to match your project.
-
Add a UI mockup of your intended final product. Note that the image of the UI should be
docs/images/Ui.pngso that it can be downloaded by our scripts. Limit the file to contain one screenshot/mockup only and ensure the new image is roughly the sameheight x widthproportions as the original one. Reason: when we compile these images from all teams into one page (example), yours should not look out of place.
If you did the above update correctly, UI mock up and profile photos should appear in your project website and this Project List Page. -
Update all contents to match your own project.
-
Update the link of the GitHub Actions build status badge (
 ) so that it reflects the build status of your team repo.
 -
Acknowledge the original source of the code e.g.,
This project is based on the AddressBook-Level3 project created by the [SE-EDU initiative](https://se-education.org).
-
-
Update site-wide settings as described in the guide Using Jekyll for project documentation @SE-EDU/guides.
3 Update the UG
- Move the draft UG content into the User Guide page in your repository. Update the content as necessary. If a feature is not implemented in the current version, you can either omit it from the UG or mark it as 'Coming soon' (e.g.,
## Archiving contacts [coming soon]).
As mentioned before, while it is more convenient for one person to update the entire UG, we recommend that each person updates their own part of the docs so that we can easily track the contribution of each member using RepoSense.
Recommended: Divide i.e., work related to the User Guide and the Developer Guidedocumentation work among team members equally; preferably based on enhancements/features each person would be adding e.g., If you are the person planing to add a feature X, you should be the person to describe the feature X in the User Guide and in the Developer Guide.
Reason: In the final project evaluation your documentation skills will be graded based on sections of the User/Developer Guide you have written.
Admin tP: Grading → Documentation
4. Project Grading: Documentation [ 10 marks]
Evaluates: your contribution to project documents
Method: Evaluated in two steps.
- Step 1: Evaluate the whole UG and DG. This is evaluated by peers who tested your product, and tutors.
Admin tP → PE → Grading Instructions for User Guide
Evaluate based on fit-for-purpose, from the perspective of a target user.
For reference, the AB3 UG is here.
Admin tP → PE → Grading Instructions for Developer Guide
Evaluate based on fit-for-purpose from the perspective of a new team member trying to understand the product's internal design by reading the DG.
For reference, the AB3 DG is here.
- Step 2: Evaluate how much of that effort can be attributed to you. This is evaluated by team members, and tutors.
Admin Peer Evaluations → Questions used for Evaluating the Contribution to the UG
Admin Peer Evaluations → Questions used for Evaluating the Contribution to the DG
Uses the Equal Share +/- N% scale for the answer
- In addition, UG and DG bugs you received in the PE will be considered for grading this component.
These are considered UG bugs (if they hinder the reader):
Use of visuals
- Not enough visuals e.g., screenshots/diagrams
- The visuals are not well integrated to the explanation
- The visuals are unnecessarily repetitive e.g., same visual repeated with minor changes
Use of examples:
- Not enough or too many examples e.g., sample inputs/outputs
Explanations:
- The explanation is too brief or unnecessarily long.
- The information is hard to understand for the target audience. e.g., using terms the reader might not know
Neatness/correctness:
- looks messy
- not well-formatted
- broken links, other inaccuracies, typos, etc.
- hard to read/understand
- unnecessary repetitions (i.e., hard to see what's similar and what's different)
These are considered DG bugs (if they hinder the reader):
Those given as possible UG bugs ...
These are considered UG bugs (if they hinder the reader):
Use of visuals
- Not enough visuals e.g., screenshots/diagrams
- The visuals are not well integrated to the explanation
- The visuals are unnecessarily repetitive e.g., same visual repeated with minor changes
Use of examples:
- Not enough or too many examples e.g., sample inputs/outputs
Explanations:
- The explanation is too brief or unnecessarily long.
- The information is hard to understand for the target audience. e.g., using terms the reader might not know
Neatness/correctness:
- looks messy
- not well-formatted
- broken links, other inaccuracies, typos, etc.
- hard to read/understand
- unnecessary repetitions (i.e., hard to see what's similar and what's different)
Architecture:
- Symbols used are not intuitive
- Indiscriminate use of double-headed arrows
- e.g., the sequence diagram showing interactions between main componentsarchitecture-level diagrams contain lower-level details
- Description given are not sufficiently high-level
UML diagrams:
- Notation incorrect or not compliant with the notation covered in the module.
- Some other type of diagram used when a UML diagram would have worked just as well.
- The diagram used is not suitable for the purpose it is used.
- The diagram is too complicated.
Code snippets:
- Excessive use of code e.g., a large chunk of code is cited when a smaller extract of would have sufficed.
Problems in User Stories. Examples:
- Incorrect format
- All three parts are not present
- The three parts do not match with each other
- Important user stories missing
Problems in Use Cases. Examples:
- Formatting/notational errors
- Incorrect step numbering
- Unnecessary UI details mentioned
- Missing/unnecessary steps
- Missing extensions
Problems in NFRs. Examples:
- Not really a Non-Functional Requirement
- Not scoped clearly (i.e., hard to decide when it has been met)
- Not reasonably achievable
- Highly relevant NFRs missing
Problems in Glossary. Examples:
- Unnecessary terms included
- Important terms missing
4 Update the DG: user stories, glossary, NFRs, use cases
-
Add the following to the DG, based on your project notes from the previous weeks.
Some examples of these can be found in the AB3 Developer Guide.- Target user profile, value proposition, and user stories: Update the target user profile and value proposition to match the project direction you have selected. Give a list of the user stories (and update/delete existing ones, if applicable), including priorities. This can include user stories considered but will not be included in the final product.
- Use cases: Give use cases (textual form) for a few representative user stories that need multiple steps to complete. e.g. Adding a tag to a person (assume the user needs to find the person first)
- Non-functional requirements: Note: Many of the given project constraints can be considered NFRs. You can add more. e.g. performance requirements, usability requirements, scalability requirements, etc.
- Glossary: Define terms that are worth recording.
Requirements → Specifying Requirements → Use Cases →
Use case: A description of a set of sequences of actions, including variants, that a system performs to yield an observable result of value to an actor.[ 📖 : uml-user-guideThe Unified Modeling Language User Guide, 2e, G Booch, J Rumbaugh, and I Jacobson ]
Actor: An actor (in a use case) is a role played by a user. An actor can be a human or another system. Actors are not part of the system; they reside outside the system.
A use case describes an interaction between the user and the system for a specific functionality of the system.
Example 1: 'transfer money' use case for an online banking system
System: Online Banking System (OBS)
Use case: UC23 - Transfer Money
Actor: User
MSS:
  1. User chooses to transfer money.
  2. OBS requests for details of the transfer.
  3. User enters the requested details.
  4. OBS requests for confirmation.
  5. User confirms.
  6. OBS transfers the money and displays the new account balance.
  Use case ends.
Extensions:
  3a. OBS detects an error in the entered data.
      3a1. OBS requests for the correct data.
      3a2. User enters new data.
      Steps 3a1-3a2 are repeated until the data entered are correct.
      Use case resumes from step 4.

  3b. User requests to effect the transfer in a future date.
      3b1. OBS requests for confirmation.
      3b2. User confirms future transfer.
      Use case ends.

  *a. At any time, User chooses to cancel the transfer.
      *a1. OBS requests to confirm the cancellation.
      *a2. User confirms the cancellation.
      Use case ends.
Example 2: 'upload file' use case of an LMS
- System: A Learning Management System (LMS)
- Actor: Student
- Use Case: Upload file
- Student requests to upload file
- LMS requests for the file location
- Student specifies the file location
- LMS uploads the file
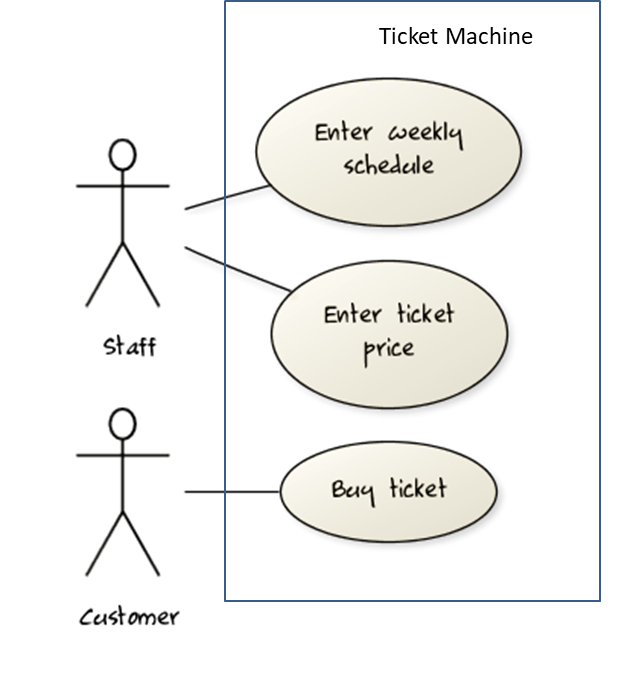
UML includes a diagram type called use case diagrams that can illustrate use cases of a system visually, providing a visual ‘table of contents’ of the use cases of a system.
In the example on the right, note how use cases are shown as ovals and user roles relevant to each use case are shown as stick figures connected to the corresponding ovals.
Unified Modeling Language (UML) is a graphical notation to describe various aspects of a software system. UML is the brainchild of three software modeling specialists James Rumbaugh, Grady Booch and Ivar Jacobson (also known as the Three Amigos). Each of them had developed their own notation for modeling software systems before joining forces to create a unified modeling language (hence, the term ‘Unified’ in UML). UML is currently the de facto modeling notation used in the software industry.
Use cases capture the functional requirements of a system.
Requirements → Requirements →
Requirements can be divided into two in the following way:
- Functional requirements specify what the system should do.
- Non-functional requirements specify the constraints under which the system is developed and operated.
Some examples of non-functional requirement categories:
- Data requirements e.g. size, how often do data changevolatility, saving data permanentlypersistency etc.,
- Environment requirements e.g. technical environment in which the system would operate in or needs to be compatible with.
- Accessibility, Capacity, Compliance with regulations, Documentation, Disaster recovery, Efficiency, Extensibility, Fault tolerance, Interoperability, Maintainability, Privacy, Portability, Quality, Reliability, Response time, Robustness, Scalability, Security, Stability, Testability, and more ...
Some concrete examples of NFRs
- Business/domain rules: e.g. the size of the minefield cannot be smaller than five.
- Constraints: e.g. the system should be backward compatible with data produced by earlier versions of the system; system testers are available only during the last month of the project; the total project cost should not exceed $1.5 million.
- Technical requirements: e.g. the system should work on both 32-bit and 64-bit environments.
- Performance requirements: e.g. the system should respond within two seconds.
- Quality requirements: e.g. the system should be usable by a novice who has never carried out an online purchase.
- Process requirements: e.g. the project is expected to adhere to a schedule that delivers a feature set every one month.
- Notes about project scope: e.g. the product is not required to handle the printing of reports.
- Any other noteworthy points: e.g. the game should not use images deemed offensive to those injured in real mine clearing activities.
You may have to spend an extra effort in digging NFRs out as early as possible because,
- NFRs are easier to miss e.g., stakeholders tend to think of functional requirements first
- sometimes NFRs are critical to the success of the software. E.g. A web application that is too slow or that has low security is unlikely to succeed even if it has all the right functionality.
Exercises
TEAMMATES NFRs
Given below are some requirements of TEAMMATES (an online peer evaluation system for education). Which one of these are non-functional requirements?
- a. The response to any use action should become visible within 5 seconds.
- b. The application admin should be able to view a log of user activities.
- c. The source code should be open source.
- d. A course should be able to have up to 2000 students.
- e. As a student user, I can view details of my team members so that I can know who they are.
- f. The user interface should be intuitive enough for users who are not IT-savvy.
- g. The product is offered as a free online service.
(a)(c)(d)(f)(g)
Explanation: (b) are (e) are functions available for a specific user types. Therefore, they are functional requirements. (a), (c), (d), (f) and (g) are either constraints on functionality or constraints on how the project is done, both of which are considered non-functional requirements.
Requirements → Specifying Requirements → Glossary →
Glossary: A glossary serves to ensure that all stakeholders have a common understanding of the noteworthy terms, abbreviations, acronyms etc.
Here is a partial glossary from a variant of the Snakes and Ladders game:
- Conditional square: A square that specifies a specific face value which a player has to throw before his/her piece can leave the square.
- Normal square: a normal square does not have any conditions, snakes, or ladders in it.
Requirements → Specifying Requirements → User Stories →
User story: User stories are short, simple descriptions of a feature told from the perspective of the person who desires the new capability, usually a user or customer of the system. [Mike Cohn]
A common format for writing user stories is:
User story format: As a {user type/role} I can {function} so that {benefit}
Examples (from a Learning Management System):
- As a student, I can download files uploaded by lecturers, so that I can get my own copy of the files
- As a lecturer, I can create discussion forums, so that students can discuss things online
- As a tutor, I can print attendance sheets, so that I can take attendance during the class
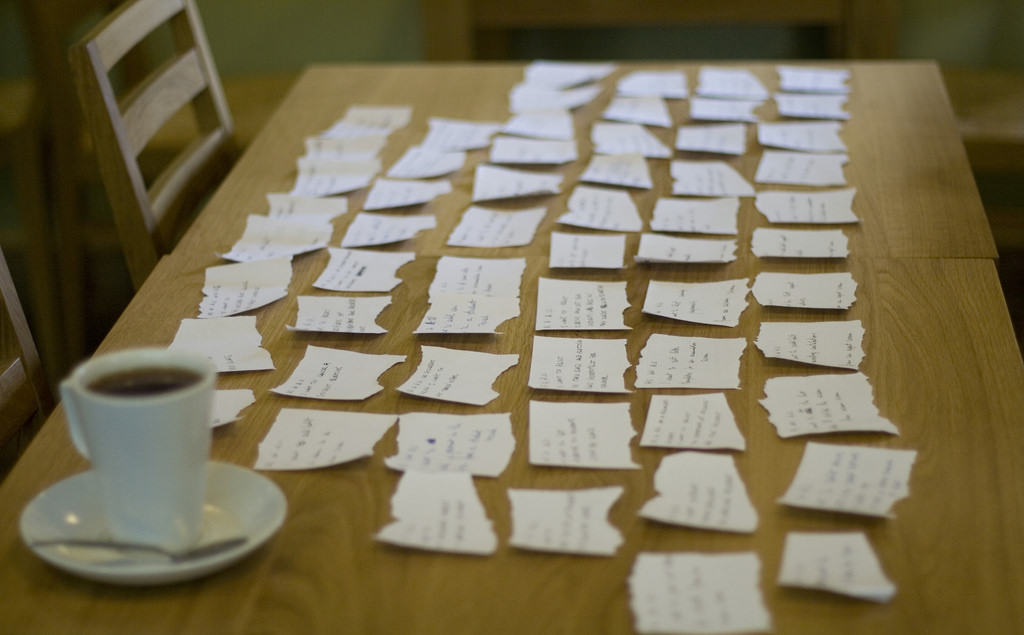
You can write user stories on index cards or sticky notes, and arrange them on walls or tables, to facilitate planning and discussion. Alternatively, you can use a software (e.g., GitHub Project Boards, Trello, Google Docs, ...) to manage user stories digitally.
User stories in use
With sticky notes
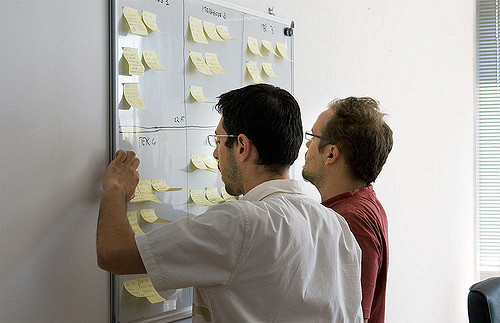
With paper
[credit: https://www.flickr.com/photos/jakuza/with/2726048607/]
With software

[credit: https://commons.wikimedia.org/wiki/File:User_Story_Map_in_Action.png]
Exercises
Which of these are true about user stories?
- a. They are based on stories users tell about similar systems
- b. They are written from the user/customer perspective
- c. They are always written in some physical medium such as index cards or sticky notes
- a. Reason: Despite the name, user stories are not related to 'stories' about the software.
- b.
- c. Reason: It is possible to use software to record user stories. When the team members are not co-located this may be the only option.
What's wrong with this user story?
Critique the following user story taken from a software project to build an e-commerce website.
As a developer, I want to use Python to implement the software, so that we can reuse existing Python modules.
Refer to the definition of a user story.
User story: User stories are short, simple descriptions of a feature told from the perspective of the person who desires the new capability, usually a user or customer of the system. [Mike Cohn]
This user story is not written from the perspective of the user/customer.
Extract user stories from customer statement
Bill wants you to build a Human Resource Management (HRM) system. He mentions that the system will help employees to view their own The number of leave days not yet takenleave balance. What are the user stories you can extract from that statement?
Remember to follow the correct format when writing user stories.
User story format: As a {user type/role} I can {function} so that {benefit}
As an employee, I can view my leave balance, so that I can know how many leave days I have left.
Note: the {benefit} part may vary as it is not specifically mentioned in the question.
5 Plan the next iteration
- Plan the next iteration. As you know, you should follow the breadth-first iterative process. Therefore, first you must decide what functionalities should be in the product if you had only two weeks to implement it. You have done that already when you chose user stories for v1.2, translated that to features, and even drafted the UG based on those features. You can tweak that plan further at this point if you wish, given that you now have some idea of how fast the team can work when using the prescribed workflow.
- Aim to produce a working MVP at the end of this iteration even if the functionalities are not polished (polishing can be done in a later iteration).
- If possible, break the iteration into two increments i.e., aim to produce an even simpler but working version after one week.
- Avoid depth-first implementations: "I'll do the back-end part of feature X in this iteration" is not acceptable as that is not in the spirit of iterative development. Remember, we are pretending this to be the last iteration; why would you implement the back-end part of a feature in the last iteration?
It is OK to add simpler versions of bigger features, but not OK to add partial features that can't be used yet.
- Divide the work among the team members i.e., the work required for the current iteration.
- Reflect the above plan in the issue tracker by assigning the corresponding issues (create new issues if necessary) to yourself and to the corresponding milestone. For example, the user story pertaining to the increment
show a place holder for photo, showing a generic default imageshould be assigned to Jake and to milestonev1.2
Optionally, you can define amid-v1.2milestone to keep track of things to be done within the first half of the milestone.
6 Start implementing the next version
- If you have time, start implementing v1.2.